Updating this entire post as a lot has changed. The old post is at the bottom of this post.
Originally, I saw a link come across my google feed for easily automating the opening/closing of a garage door based on an ESP8266 beacon placed inside your car. The original post is here:
credit: https://hackaday.com/2018/01/21/esp8266-beacon-announces-your-arrival/
I made some changes to make this work better for my situation. I wanted an additional input from the ignition switch so that I knew when the car was running/not running and when the car is within range/not. The original sketch is simply car is on or off. That works in a lot of scenarios but for me, sometimes I don’t always pull the car in the garage. What that means is the door will be actuated needlessly or not actuated ideally.
I also had some stability problems with the beacon not updating after a somewhat long period of time. Not being skilled enough to debug the arduino code well enough I set it to reboot every 10 minutes. This of course makes it look like the car has left when it really hasn’t. This is dealt with in the rules so as not to actuate the door unnecessarily.
The arduino is powered by 12v CONSTANT and Ignition is SWITCHED on/off with car. Probe your car’s fuse box for the appropriate fuses and feed the arduino from those. I used 2 DC-DC converters that output 3.3v from a wide DC input range.
This is the code loaded on my wemos d1 pro mini:
////////////////////////////////////////////////////////////////////////////////////////////////////
// Modify these values for your environment
const char* wifiSSID = "YOURSSID";  // Your WiFi network name
const char* wifiPassword = "YOURPSK";  // Your WiFi network password
const char* otaPassword = "";  // OTA update password
const char* mqttServer = "IP OF YOUR MQTT BROKER";  // Your MQTT server IP address
const char* mqttUser = ""; // mqtt username, set to "" for no user
const char* mqttPassword = ""; // mqtt password, set to "" for no password
const String mqttNode = "gti"; // Your unique hostname for this device
const String mqttDiscoveryPrefix = "/beacon"; // Home Assistant MQTT Discovery, see https://home-assistant.io/docs/mqtt/discovery/
////////////////////////////////////////////////////////////////////////////////////////////////////

// Home Assistant MQTT Discovery, see https://home-assistant.io/docs/mqtt/discovery/
// We'll create one binary_sensor device to track MQTT connectivity
const String mqttDiscoBinaryStateTopic = mqttDiscoveryPrefix + "/binary_sensor/" + mqttNode + "/state";
const String mqttDiscoBinaryConfigTopic = mqttDiscoveryPrefix + "/binary_sensor/" + mqttNode + "/config";
// And a sensor for WiFi signal strength
const String mqttDiscoSignalStateTopic = mqttDiscoveryPrefix + "/sensor/" + mqttNode + "-signal/state";
const String mqttDiscoSignalConfigTopic = mqttDiscoveryPrefix + "/sensor/" + mqttNode + "-signal/config";
// And a sensor for device uptime
const String mqttDiscoUptimeStateTopic = mqttDiscoveryPrefix + "/sensor/" + mqttNode + "-uptime/state";
const String mqttDiscoUptimeConfigTopic = mqttDiscoveryPrefix + "/sensor/" + mqttNode + "-uptime/config";
// We'll create one switch device - waspie
const String mqttDiscoSwitchStateTopic = mqttDiscoveryPrefix + "/switch/" + mqttNode + "/state";
const String mqttDiscoSwitchConfigTopic = mqttDiscoveryPrefix + "/switch/" + mqttNode + "/config";

// The strings below will spill over the PubSubClient_MAX_PACKET_SIZE 128
// You'll need to manually set MQTT_MAX_PACKET_SIZE in PubSubClient.h to 512
const String mqttDiscoBinaryConfigPayload = "{\"name\": \"" + mqttNode + "\", \"device_class\": \"connectivity\", \"state_topic\": \"" + mqttDiscoBinaryStateTopic + "\"}";
const String mqttDiscoSignalConfigPayload = "{\"name\": \"" + mqttNode + "-signal\", \"device_class\": \"sensor\", \"state_topic\": \"" + mqttDiscoSignalStateTopic + "\", \"unit_of_measurement\": \"dBm\", \"value_template\": \"{{ value }}\"}";
const String mqttDiscoUptimeConfigPayload = "{\"name\": \"" + mqttNode + "-uptime\", \"device_class\": \"sensor\", \"state_topic\": \"" + mqttDiscoUptimeStateTopic + "\", \"unit_of_measurement\": \"msec\", \"value_template\": \"{{ value }}\"}";
const String mqttDiscoSwitchConfigPayload = "{\"name\": \"" + mqttNode + "\", \"device_class\": \"sensor\", \"state_topic\": \"" + mqttDiscoSwitchStateTopic + "\"}";

// Set the signal strength and uptime reporting interval in milliseconds
const unsigned long reportInterval = 5000;
unsigned long reportTimer = millis();

// Set LED "twinkle" time for maximum daylight visibility <----I TURNED THIS OFF SINCE I WONT SEE IT ANYWAY
//const unsigned long twinkleInterval = 50;
//unsigned long twinkleTimer = millis();

//Switch pin to GPIO14 <--- IGNITION SWITCH INPUT (make sure to step it down to 3.3v MAX!!!!!
int switchPin = 4;

#include <ESP8266WiFi.h>
#include <ESP8266mDNS.h>
#include <WiFiUdp.h>
#include <ArduinoOTA.h>
#include <PubSubClient.h>

WiFiClient wifiClient;
PubSubClient mqttClient(wifiClient);

////////////////////////////////////////////////////////////////////////////////////////////////////
// System setup
void setup() {
  //pinMode(LED_BUILTIN, OUTPUT);
  //digitalWrite(LED_BUILTIN, HIGH);
  Serial.begin(115200);
  pinMode(switchPin,INPUT);

  Serial.println("\nHardware initialized, starting program load");

  // Start up networking
  setupWifi();

  // Create server and assign callbacks for MQTT
  mqttClient.setServer(mqttServer, 1883);
  mqttClient.setCallback(mqtt_callback);

  // Start up OTA
 // if (otaPassword[0]) {
    setupOTA();
  //}

  Serial.println("Initialization complete\n");
}

////////////////////////////////////////////////////////////////////////////////////////////////////
// Main execution loop
void loop() {
  // check WiFi connection
  if (WiFi.status() != WL_CONNECTED) {
    setupWifi();
  }

  // check MQTT connection
  if (!mqttClient.connected()) {
    mqttConnect();
  }

  // MQTT client loop
  if (mqttClient.connected()) {
    mqttClient.loop();
  }

  // LED twinkle <----I TURNED THIS OFF SINCE I WONT SEE IT ANYWAY
  //if (mqttClient.connected() && ((millis() - twinkleTimer) >= twinkleInterval)) {
  //  digitalWrite(LED_BUILTIN, !digitalRead(LED_BUILTIN));
  //  twinkleTimer = millis();
  //}

  // Report signal strength and uptime <---- I TURNED THIS OFF
  if (mqttClient.connected() && ((millis() - reportTimer) >= reportInterval)) {
    String signalStrength = String(WiFi.RSSI());
    //String uptimeTimer = String(millis());
    mqttClient.publish(mqttDiscoSignalStateTopic.c_str(), signalStrength.c_str());
    //mqttClient.publish(mqttDiscoUptimeStateTopic.c_str(), uptimeTimer.c_str());
    reportTimer = millis();

    if ( millis() > 600000) {
      ESP.restart();
    }
    int ignition;
    ignition=digitalRead(switchPin);
    if( ignition==HIGH ) {
      mqttClient.publish(mqttDiscoSwitchStateTopic.c_str(), "ON");
    } else if ( ignition == LOW ) {
      mqttClient.publish(mqttDiscoSwitchStateTopic.c_str(), "OFF");
    }
    //Serial.println(millis());
  }

  // OTA loop
  //if (otaPassword[0]) {
    ArduinoOTA.handle();
  //}
}

////////////////////////////////////////////////////////////////////////////////////////////////////
// Functions

////////////////////////////////////////////////////////////////////////////////////////////////////
// Handle incoming commands from MQTT
void mqtt_callback(char* topic, byte* payload, unsigned int payloadLength) {
}

////////////////////////////////////////////////////////////////////////////////////////////////////
// Connect to WiFi
void setupWifi() {
  Serial.print("Connecting to WiFi network: " + String(wifiSSID));
  WiFi.hostname(mqttNode.c_str());
  WiFi.mode(WIFI_STA);
  WiFi.begin(wifiSSID, wifiPassword);

  while (WiFi.status() != WL_CONNECTED) {
    // Wait 500msec seconds before retrying
    delay(250);
    Serial.print(".");
    Serial.println(millis());
        if ( millis() > 60000) {
      ESP.restart();
    }
  }
  Serial.println("\nWiFi connected successfully and assigned IP: " + WiFi.localIP().toString());
}

////////////////////////////////////////////////////////////////////////////////////////////////////
// MQTT connection and subscriptions
void mqttConnect() {
  //digitalWrite(LED_BUILTIN, HIGH);
  Serial.println("Attempting MQTT connection to broker: " + String(mqttServer));
  // Attempt to connect to broker, setting last will and testament
  if (mqttClient.connect(mqttNode.c_str(), mqttUser, mqttPassword, mqttDiscoBinaryStateTopic.c_str(), 1, 1, "OFF")) {
    // when connected, record signal strength and reset reporting timer
    String signalStrength = String(WiFi.RSSI());
    reportTimer = millis();
    String uptimeTimer = String(millis());
    // publish MQTT discovery topics and device state
    Serial.println("MQTT discovery connectivity config: [" + mqttDiscoBinaryConfigTopic + "] : [" + mqttDiscoBinaryConfigPayload + "]");
    Serial.println("MQTT discovery connectivity state: [" + mqttDiscoBinaryStateTopic + "] : [ON]");
    Serial.println("MQTT discovery signal config: [" + mqttDiscoSignalConfigTopic + "] : [" + mqttDiscoSignalConfigPayload + "]");
    Serial.println("MQTT discovery signal state: [" + mqttDiscoSignalStateTopic + "] : " + WiFi.RSSI());
    Serial.println("MQTT discovery uptime config: [" + mqttDiscoUptimeConfigTopic + "] : [" + mqttDiscoUptimeConfigPayload + "]");
    Serial.println("MQTT discovery uptime state: [" + mqttDiscoUptimeStateTopic + "] : " + uptimeTimer);
    mqttClient.publish(mqttDiscoBinaryConfigTopic.c_str(), mqttDiscoBinaryConfigPayload.c_str(), true);
    mqttClient.publish(mqttDiscoBinaryStateTopic.c_str(), "ON");
    mqttClient.publish(mqttDiscoSignalConfigTopic.c_str(), mqttDiscoSignalConfigPayload.c_str(), true);
    mqttClient.publish(mqttDiscoSignalStateTopic.c_str(), signalStrength.c_str());
    mqttClient.publish(mqttDiscoUptimeConfigTopic.c_str(), mqttDiscoUptimeConfigPayload.c_str(), true);
    mqttClient.publish(mqttDiscoUptimeStateTopic.c_str(), uptimeTimer.c_str());
    mqttClient.publish(mqttDiscoSwitchConfigTopic.c_str(), mqttDiscoSwitchConfigPayload.c_str(), true);
    mqttClient.publish(mqttDiscoSwitchStateTopic.c_str(), "OFF");
    Serial.println("MQTT connected");
    digitalWrite(LED_BUILTIN, LOW);
  }
  else {
    Serial.println("MQTT connection failed, rc=" + String(mqttClient.state()));
    Serial.println(millis());
     if ( millis() > 240000) {
      ESP.restart();
    }
  }
}

////////////////////////////////////////////////////////////////////////////////////////////////////
// (mostly) boilerplate OTA setup from library examples
void setupOTA() {
  // Start up OTA
  // ArduinoOTA.setPort(8266); // Port defaults to 8266
  ArduinoOTA.setHostname(mqttNode.c_str());
  ArduinoOTA.setPassword(otaPassword);

  ArduinoOTA.onStart([]() {
    Serial.println("ESP OTA:  update start");
  });
  ArduinoOTA.onEnd([]() {
    Serial.println("ESP OTA:  update complete");
  });
  ArduinoOTA.onProgress([](unsigned int progress, unsigned int total) {
    //Serial.printf("Progress: %u%%\r", (progress / (total / 100)));
  });
  ArduinoOTA.onError([](ota_error_t error) {
    Serial.println("ESP OTA:  ERROR code " + String(error));
    if (error == OTA_AUTH_ERROR) Serial.println("ESP OTA:  ERROR - Auth Failed");
    else if (error == OTA_BEGIN_ERROR) Serial.println("ESP OTA:  ERROR - Begin Failed");
    else if (error == OTA_CONNECT_ERROR) Serial.println("ESP OTA:  ERROR - Connect Failed");
    else if (error == OTA_RECEIVE_ERROR) Serial.println("ESP OTA:  ERROR - Receive Failed");
    else if (error == OTA_END_ERROR) Serial.println("ESP OTA:  ERROR - End Failed");
  });
  ArduinoOTA.begin();
  Serial.println("ESP OTA:  Over the Air firmware update ready");
}
You’ll see some of the changes I made noted by text in CAPS. I tuned off some stuff that I don’t care about and added the ignition switch on/off and reboot after 10 minutes.
These are the items (FOR MQTT 1.x binding):
Switch	carA							"Scott's GTI"							(gCar,location)			{ mqtt="<[oh2:/beacon/binary_sensor/gti/state:command:default]" }
Switch	carADisconnected				"GTI Beacon Disconnected"				(location)				{ expire="2m, command=OFF" }
Switch	carAIgn							"GTI Ignition"							(gCarIgn,location)		{ mqtt="<[oh2:/beacon/switch/gti/state:state:default]" }
Switch	carAIgnTimer					"GTI Ignition Timer"					(location)				{ expire="2m, command=OFF" }
You’ll see the topics that get created by the arduino code above in the items definitions:
/beacon/binary_sensor/gti/state <–Car present or not
/beacon/switch/gti/state <-- Car ignition switch on or off
the carADisconnected item is a check “valve” that helps handle the 10 minute reboot.
the carAIgnTimer is used to CLOSE the garage door when the car has returned home and is in the garage.
Occupancy IN the garage is determined with a separate ESP8266 running ESPEasy and using an ultrasonic sensor. Here’s the relevant rule in ESPEasy and corresponding item in openHAB:
on garageBayA#GBA do
if [garageBayA#GBA]>30 and [garageBayA#GBA]<40
Publish /%sysname%/gbaOcc,1
else
Publish /%sysname%/gbaOcc,0
endif
endon
Number gbAOcc (gBayOcc) { mqtt="<[oh2:/garage/gbaOcc:state:default]", expire="2m,command=0" }

The ESP sends a “1” for occupancy and “0” for no occupancy. The same ESP uses a transistor to simulate a button press. I have OLD garage door openers from the 80s. Fortunately, they had an IR beam port and I managed to find some old, unused compatibly IR beams purchased off of ebay to add some safety to the door openers.
See this post on the ESPEasy forum for using the ESP to simulate a button press:
https://www.letscontrolit.com/forum/viewtopic.php?f=4&t=1643&p=7450&hilit=garage+transistor#p7450
The relevant items that send the button command to the ESP:
Switch	gdaButton				"Garage Door A Button"					(gDoorButton)				[ "Switchable" ]	{ mqtt=">[oh2:gda:command:*:MAP(onoff.map)]",expire="1s, command=OFF" }

Switch	gdbButton				"Garage Door B Button"					(gDoorButton)				[ "Switchable" ]	{ mqtt=">[oh2:gdb:command:*:MAP(onoff.map)]",expire="1s, command=OFF" }
ESP Rule for handling the button press:
on garageDoors#gda=1 do
mcppulse 29,1,400
mcpgpio 29,0
endon
My openers also have a reed switch at both the opened and closed position putting out ~9VDC and 0VDC depending on position. I used a voltage divider w/ 10k and 16k(i think) resistors to drop the voltage to about 3VDC which is sensed by the same ESP and sends door position. I know there are more reliable? safer? ways to drop the 9VDC but it works and has for over a year so…whatever. do what you do.
ESPEasy rule:
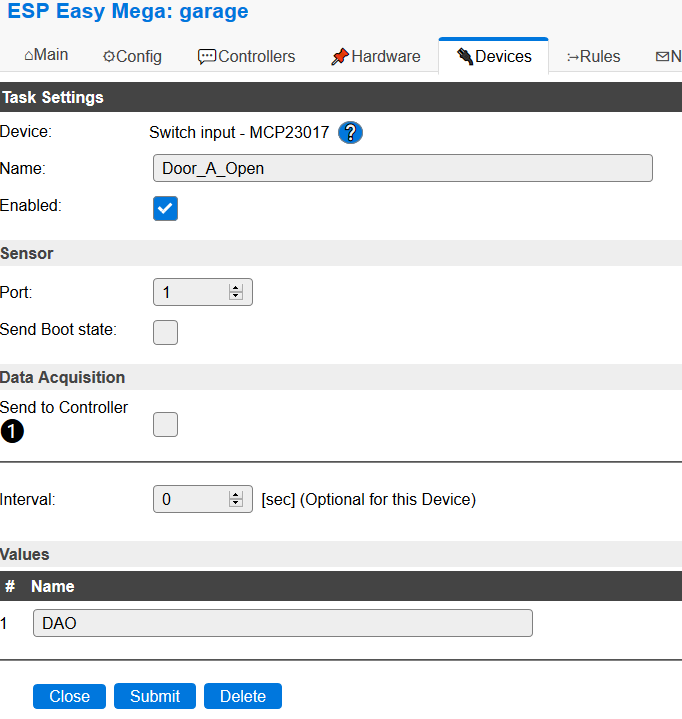
on Door_A_Open#DAO do
if [Door_A_Open#DAO]=0 and [Door_A_Close#DAC]=1
Publish /%sysname%/daStatus,CLOSED
else
Publish /%sysname%/daStatus,OPEN
endif
endon
String dAStatus "Garage Door A Open/Closed [%s]" (gGarageDoors) { mqtt="<[oh2:/garage/daStatus:command:default]" }
I’m using an MCP23017 channel expander. If you’re not tasking your ESP with as many things you may have enough inputs to just use what’s already there.
Switch garageDoorBypass "Garage Door Actions Bypass" { expire="5m,command=OFF"}
^^^ This item is a virtual switch used in my sitemap to stop any automated actions for a few minutes in case I know I don’t want the door opening/closing for whatever reason
That should sum up all of the items in use as well as all the sensors involved. Now, the openhab rules.
I used a lot of name replacement stuff since I have two doors and don’t want so many rules.
This handles the opening/closing of the door. The door is only closed for car A with occupancy. I do this since car B is the kid hauler and can’t be reliably closed once that car is pulled in.
rule "Garage Door Actions - Leave from Garage"
when
	Member of gCarIgn changed or
	Member of gCar changed or
	Item carAIgnTimer changed from ON to OFF
then
	val name = triggeringItem.name.replace("IgnTimer","").replace("Ign","")
	val letter = name.charAt(name.length() - 1)
	val letter2 = triggeringItem.name.replace("carAIgnTimer","a").replace("carA","a").replace("carAIgn","a").replace("carB","b").replace("carBIgn","b")
	val car = gCar.members.findFirst[ i | i.name == "car"+letter ]
	val occupancy = gBayOcc.members.findFirst[ i | i.name == "gb"+letter+"Occ" ]
	val door = gGarageDoors.members.findFirst[ i | i.name == "d"+letter+"Status" ]
	val ign = gCarIgn.members.findFirst[ i | i.name == "car"+letter+"Ign" ]
	val button = gDoorButton.members.findFirst[ i | i.name == "gd"+letter2+"Button" ]
	val disconnected = location.members.findFirst[ i | i.name == "car"+letter+"Disconnected" ]
	if ( triggeringItem.name == "carA" || triggeringItem.name == "carB") {
		//if ( car.state == ON && door.state.toString == "CLOSED" && occupancy.state == 0 && disconnected.state == OFF && ign.state== ON && garageDoorBypass.state !=ON)
		Thread::sleep(100)
		if ( car.state == ON && door.state.toString == "CLOSED" && occupancy.state == 0 && disconnected.state == OFF && garageDoorBypass.state !=ON)
			button.sendCommand(ON)
			//comingHome.sendCommand(ON)
		createTimer(now.plusSeconds(2),[|
			if ( car.state == OFF && door.state.toString == "OPEN" && occupancy.state == 0 && ign.state == ON && garageDoorBypass.state != ON )
				button.sendCommand(ON)
		])
	}
	if ( triggeringItem.name == "carAIgn" || triggeringItem.name == "carBIgn" ) {
		logInfo("car ignition triggered rule",triggeringItem.name.toString)
		if ( ign.state == ON && door.state.toString == "CLOSED" && occupancy.state == 1 && garageDoorBypass.state != ON )
			button.sendCommand(ON)
		if ( triggeringItem.name == "carAIgn" && ign.state == ON )
				carAIgnTimer.sendCommand(ON)
	}
	if ( triggeringItem.name == "carAIgnTimer" )
		if ( carAIgnTimer.state == OFF && occupancy.state == 1 && garageDoorBypass.state != ON && car.state == ON )
			button.sendCommand(ON)
end
I know this looks like a lot, but it can be done and it’s relatively easy. It will take you a few hours, but you have the benefit of me working on this for several months and getting it right. It can probably be improved further. For now, it works great.
Summary
This came across on my google feed the other day. I was trying to use owntracks to do what this accomplishes but owntracks isn’t particularly reliable. If your phone is off, it doesn’t do anything to update your location.
credit: https://hackaday.com/2018/01/21/esp8266-beacon-announces-your-arrival/
He uses an ESP with a fairly simple MQTT sketch to send an ON state on a topic. It also configures a last will and testament for the same topic that will send an OFF state when the ESP loses connectivity (you drive away from your house and out of range).
You need to wire your ESP to an ignition-switched source in your car. When you turn your car on, the ESP powers up and quickly connects to your wifi. After connecting it fires off the ON state. This all happens really quickly, maybe just 2-3 seconds. The example he’s using opens and closes the door. I’m not quite interested in the automation of the closing of my garage door but the opening for sure. Of course you can trigger all sorts of other stuff, too.
The relevant portion of this sketch that you’ll need to modify to your needs is all at the top:
////////////////////////////////////////////////////////////////////////////////////////////////////

// Modify these values for your environment

const char* wifiSSID = "wifissid";  // Your WiFi network name

const char* wifiPassword = "wifipassword";  // Your WiFi network password

const char* otaPassword = "";  // OTA update password

const char* mqttServer = "192.168.1.2";  // Your MQTT server IP address

const char* mqttUser = ""; // mqtt username, set to "" for no user

const char* mqttPassword = ""; // mqtt password, set to "" for no password

const String mqttNode = "CarPresence"; // Your unique hostname for this device

const String mqttDiscoveryPrefix = "homeassistant"; // Home Assistant MQTT Discovery, see https://home-assistant.io/docs/mqtt/discovery/

////////////////////////////////////////////////////////////////////////////////////////////////////
add in your SSID, password, and broker IP
change CarPresence to whatever…use your car model or something
change homeassistant to /something. As you can see below I’m using /beacon as my topic
the resulting full MQTT topic:
/beacon/binary_sensor/gti/state (this is for the on/off part, uptime and rssid is different but i dont remember what they are right this second)
Corresponding item:
Switch scott_car "Scott's GTI" { mqtt="<[oh2:/beacon/binary_sensor/gti/state:state:default]" }
Simple garage door opening rule:
rule "Open Garage Door for Scott"
when
	Item scott_car changed from OFF to ON
then
        if ( Garage_Door_A.state == OFF ) {
	        GDA_Button.sendCommand(ON)
	}
end
It also sends the module’s uptime and wifi signal strength so depending on the uptime sent you know whether the car was just started in the garage or your drove all the way home from work.
You could probably remove some of the MQTT stuff as the entire topic is kind of long and unnecessary but I don’t know how to write the code all that well and i didn’t want to spend a lot of time flashing and reflashing my ESP to make sure I got it all right. Its enough of a pain soldering to a bare esp-12 without having to move wires around several times to run / flash it.
hopefully this is of some use to someone
