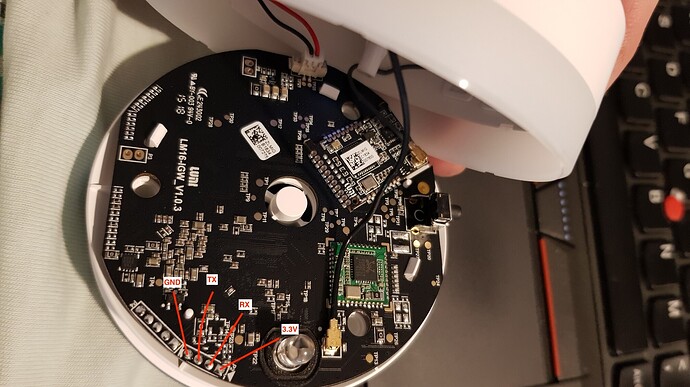
@Pawel_Kowalski fairly simple:
I never know how to describe RX/TX so it might be otherwise. ![]()
There are two ways of connecting:
To get to bootloader:
- Solder GND, RX and TX.
- Attach GND, RX and TX to UART 3.3V.
- You can connect all three pins, but do not connect UART to USB yet.
- Plug Gateway to AC.
- Plug UART to USB. Baudrate is 115200, 8-1, no parity and no flow control.
- Press enter and you’ll see a prompt from HUSH shell of bootloader.
- You can play here to reset root password. Look below.
To get into boot process:
1-2. As above, if haven’t done already.
3. Connect all three ping to UART and connect UART to USB.
4. Baudrate is 115200, 8-1, no parity and no flow control.
5. Plug Gateway to AC.
6. You’ll get into boot process finishing with starting mi.
7. You’ll end up in fac_test (factory test tool) that is launched at the very end of booting process (in /etc/rc.local).
8. You can exit this mode with exit_factory.
9. You’ll end up with login prompt into device and unknown root password.
To reset root password:
- Boot into bootloader.
- Enter
printenvcommand. - Find
bootargs=...and copy all afterbootargs=– for me it was “console=…”. - Open notepad.
- Enter text:
setenv bootargs ' - Paste copied text.
- Enter text:
single rw init=/bin/bash'(whitespace before “single”!). - You’ll end up with smth like
setenv bootargs 'console=... someparams single rw init=/bin/bash'. - Press enter. No message should show up. If anything shows – you copied smth wrong (watch out for quotes and whitespaces).
- Now you’re done for single-user root booting.
- Before you enter
bootcommand to boot with new bootargs – prepare that you’ll have around 5s to change the root password. I don’t know why, but my prompt freezes after 5s.. You must set password that is at least long for 8 chars and contains alpfanumeric signs. Prepare password in notepad and copy it into clipboard – you’ll just paste it twice fast. - Enter
boot. Press enter. - Now boot process will start and you’ll end up in
bash#prompt. - Now you have 5s.
- Enter
passwd, press enter. - Paste twice password from clipboard.
- You’ll end up with “root password changed”.
- Success!
- Now simply turn off AC, plug UART into USB so it will follow boot process instead of going into bootloader, turn on AC again.
- Wait for boot process to end, exit factory mode.
- In login prompt enter
rootand your password from notepad/clipboard.
Now you have root access to your gateway’s Linux.
What I’ve found so far:
- This gateway looks like supporting HomeKit – check two different
/etc/rc.local.*– one for mi and one for homekit. - In default “mi” mode – there are two main processes running:
- miio_client – responsible for communication with Mi Cloud. (
/lumi/app/miio) - miio_client_helper_nomqtt.sh – miio_client helper that uses
miio_recv_lineandmiio_send_lineto mock communication between gateway and miio_client. - gw – gateway binary to communicate with sensor devices.
- miio_client – responsible for communication with Mi Cloud. (
- This one is interesting – you can launch SSH server on your gateway.
 In
In rc.localyou just need to adddropbear -p 22just beforefac_test. After this is removed my soldered pins and use gateway via SSH on port 22.
Finally
$ netstat -ulptn
Active Internet connections (only servers)
Proto Recv-Q Send-Q Local Address           Foreign Address         State       PID/Program name
tcp        0      0 127.0.0.1:54322         0.0.0.0:*               LISTEN      368/miio_client
tcp        0      0 127.0.0.1:54323         0.0.0.0:*               LISTEN      368/miio_client
udp        0      0 0.0.0.0:10008           0.0.0.0:*                           5632/gw
udp        0      0 0.0.0.0:54321           0.0.0.0:*                           368/miio_client
udp        0      0 0.0.0.0:5353            0.0.0.0:*                           368/miio_client
This actually shows that in case of Mija Gateway EU it’s not about “opening the ports”, because there are no actual multicast services working in the background. Nothing listens on 4321, 9898 etc.
