[BETA] Get rid of Milight bridges with the NRF24L01+ on Raspberry Pi

Hi all,

in the past months I was working on a project that makes it possible to control Milight lamps with the Raspberry Pi and without any additional bridge device (of course, a radio module is required, but that is directly attached to the Pi).

Why this project?

  • Normally, a seperate bridge device is needed for controlling milight lamps
  • You have to buy and operate one milight bridge per 4 groups you want to control. E.g. if you want to control 10 groups, you need to buy and operate 3 milight bridges.
  • Milight bridges use UDP and WiFi which could lead to unstable connections

What can you achieve with this?

  • If you did not buy a milight bridge yet: Save money
  • Control your milight lamps directly with the Raspberry Pi and a ~3$ NRF24L01+ radio module
  • Setup / Control as many groups as you like (up to ~ 65.000) with just one NRF24L01+ radio module
  • Get rid of all milight bridges
  • Control all milight lamps via openHAB and/or the milightV6 app (e.g. milight V3 lamps are also controlled via the milightV6 app then)

Which hardware is needed?

  • A Raspberry Pi (all variants/versions except Pico should be supported, I tested it with 3B and 4B)
  • The Milight lamps you want to control
  • The radio module NRF24L01+ (there is also a version without the “+”, that should also work)
  • 7 Female-to-Female jumper wires to connect the NRF24L01+ to the Raspberry Pi’s GPIO. If you want to keep the NRF24L01+ in within the Pi’s case, they should be short (I’d recommend 5cm, but 10cm usually should work as well).

Other relevant infos about this project

  • Status of this project is BETA. I already use it in my production system and it runs stable, but some code cleanups have to be done and there are still some ugly workarounds, e.g. path for config file is currently hard-coded to /opt/settings.json). Also, the project currently generates a bit too much CPU load for what it does.
  • This project is a port of GitHub - sidoh/esp8266_milight_hub: Replacement for a Milight/LimitlessLED hub hosted on an ESP8266 for the Raspberry Pi. Source code and documentation could be found on my fork GitHub - pfink/esp8266_milight_hub at piworking. Beware that already a small subset of features by the original project is supported by the fork (currently only radio and UDPV6 server is tested). Long-term goal is to integrate my adjustments for the Raspberry Pi into the original project.

Setup / Get started

  1. Use the jumper wires to connect the NRF24L01+ to the Raspberry Pi according to the scheme below. Of course, the red (3V3) and black (GND) cable could be connected any 3V3 / GND pin on the Pi. Different than depicted below, I connected 3V3 and GND to pin 17 and 20 as pin 1 and 5 were already occupied by my Homematic radio module.
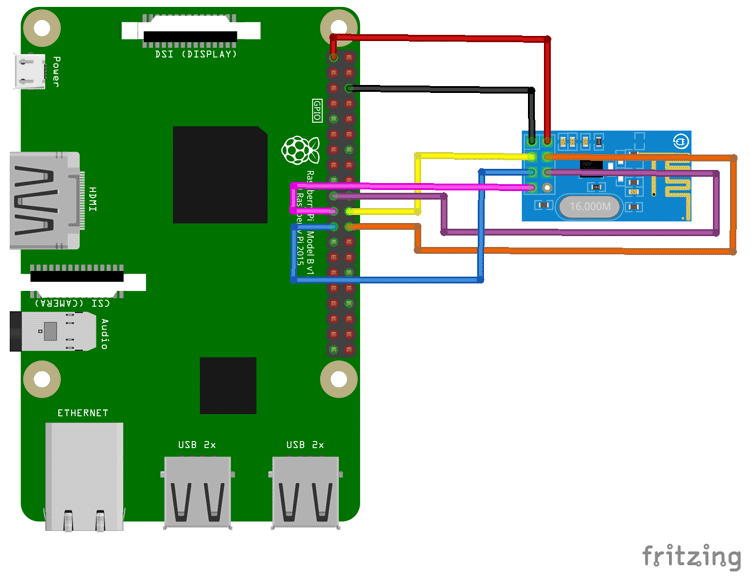

2. Follow the instructions at esp8266_milight_hub/pidocs.md at piworking · pfink/esp8266_milight_hub · GitHub.
3. Configure the emulated bridges as MilightV6 bridges in openHAB. All milight lamps have to be added as V6 milight lamps within the openHAB config, even if they’re actually V3 lamps.

3 Likes

Thanks for posting! I wonder if this should be moved to the Tutorials and Solutions category so it’s easier to find by browsing.

Sure, if you think it would be better to have it in that category, feel free to move :slight_smile: Thanks!

Just for information purposes, there is also a well established similar project and binding for use with ESP8266 that has virtually the same functionality:

As already written in my original post, this is not a “similar” project, but a port of exactly that project for the Raspberry Pi - 99,9% of the code base is unchanged, so you’ll take advantage of the maturity of the original project as well. Purpose here is not to replace the milight bridge by another bridge, but to completely eliminate the bridge. Also, as I wrote, long-term goal is to integrate the port into the original project so that it does support the Raspberry Pi as well - at least with a subset of the original features (anyhow, I think most of the these features are not really needed if you control the milight lamps with openHAB anyway).

But yes, if you don’t already operate a Raspberry Pi or you don’t care about how many bridge devices you have in your home, and you don’t have an issue being stuck to WiFi, using the ESP would be the better option.

Heya, I’ve been looking for something like this, want to eliminate the wirelss, currently using the ESP8266 original and it works great, but yeah, wanting wired. Does this option use the same binding as the ESP version, as in, could I just set this up on another Pi, and use it like the ESP version? (just change the IP address and MQTT settings?)

thanks much++

Yes of course, you can install it on the same Pi where you run openHAB or you can set it up on any other Pi.

good to know+ Was wondering if you had any more info about how to get it working with the ESPmilighthub binding. I was just playing around this morning, managed to get the software installed on a Pi, and the hardware installed. just to test, I transferred my settings.json over from my existing ESP8266 that is working with sidoh’s binding. but no luck getting it working. anyway, any tips or tricks or some instructions to get it working with the binding, I would greatly appreaciate it+ (PS. I’m using the old 2.5 OH)

I’ll include my setup I use for the ESP8266 and milight binding

Things:

Bridge espmilighthub:esp8266Bridge:001 [ADDR=“tcp://localhost:1883”, MQTT_USERNAME=“butteryak3”, MQTT_PASSWORD=“XXXXXXX”, 1TRIGGERS_NIGHT_MODE=true, DELAY_BETWEEN_MQTT=40, POWERFAILS_TO_MINDIM=true, AUTOCTEMP_MAXDIMMED_TEMPERATURE=350, FAVOURITE_WHITE=200, HUB_IP=“192.168.11.111”]
{
Thing rgbw 0x14BA1 “Kitch1”
Thing rgbw 0x14BA2 “Kitch2”
Thing rgbw 0x14BA3 “Kitch3”

Thing rgb_cct 0x88F1 “Bedroom1”
Thing rgb_cct 0x88F2 “Bedroom2”
Thing rgb_cct 0x88F3 “Bedroom3”

Thing rgb_cct 0x88E1 “Overhead”
Thing rgb_cct 0x88E2 “Spot”
Thing rgb_cct 0x88E3 “Wall”
Thing rgb_cct 0x88E4 “Sink”

Thing rgb_cct 0xAE91 “Ceiling”
Thing rgb_cct 0xAE92 “Accent”
Thing rgb_cct 0xAE93 “Bedside”
Thing rgb_cct 0xAE94 “Stars”
}

Items:

// Living Room 1 - Overhead lights
Switch Overhead_light_switch “Overhead Light Switch” {channel=“espmilighthub:rgb_cct:001:0x88E1:level”}
Dimmer Overhead_light_temp “Overhead Light Temperature” {channel=“espmilighthub:rgb_cct:001:0x88E1:colourtemperature”}
Color Overhead_light_hue “Overhead Light Hue” {channel=“espmilighthub:rgb_cct:001:0x88E1:colour”}
Dimmer Overhead_light_level “Overhead Light” {channel=“espmilighthub:rgb_cct:001:0x88E1:level”}

// Living Room 2 - Spot Lights
Switch spot_light_switch “Spot Light Switch” {channel=“espmilighthub:rgb_cct:001:0x88E2:level”}
Dimmer spot_light_temp “Spot Light Temperature” {channel=“espmilighthub:rgb_cct:001:0x88E2:colourtemperature”}
Color spot_light_hue “Spot Light Hue” {channel=“espmilighthub:rgb_cct:001:0x88E2:colour”}
Dimmer spot_light_level “Spot Light” {channel=“espmilighthub:rgb_cct:001:0x88E2:level”, ga=“light”}

// Living Room 3 - Wall lights
Switch wall_light_switch “Wall Light Switch” {channel=“espmilighthub:rgb_cct:001:0x88E3:level”}
Dimmer wall_light_temp “Wall Light Temperature” {channel=“espmilighthub:rgb_cct:001:0x88E3:colourtemperature”}
Color wall_light_hue “Wall Light Hue” {channel=“espmilighthub:rgb_cct:001:0x88E3:colour”}
Dimmer wall_light_level “Wall Light” {channel=“espmilighthub:rgb_cct:001:0x88E3:level”, ga=“light”}

// Living Room 4 - Sink lights
Switch sink_light_switch “Sink Light Switch” {channel=“espmilighthub:rgb_cct:001:0x88E4:level”}
Dimmer sink_light_temp “Sink Light Temperature” {channel=“espmilighthub:rgb_cct:001:0x88E4:colourtemperature”}
Color sink_light_hue “Sink Light Hue” {channel=“espmilighthub:rgb_cct:001:0x88E1:colour”}
Dimmer sink_light_level “Sink Light” {channel=“espmilighthub:rgb_cct:001:0x88E1:level”, ga=“light”}

// Bedroom Room 1 - Ceiling lights
Switch ceiling_light_switch “Ceiling Light Switch” {channel=“espmilighthub:rgb_cct:001:0xAE91:level”}
Dimmer ceiling_light_temp “Ceiling Light Temperature” {channel=“espmilighthub:rgb_cct:001:0xAE91:colourtemperature”}
Color ceiling_light_hue “Ceiling Light Hue” {channel=“espmilighthub:rgb_cct:001:0xAE91:colour”}
Dimmer ceiling_light_level “Ceiling Light” {channel=“espmilighthub:rgb_cct:001:0xAE91:level”, ga=“light”}

// Bedroom Room 2 - Accent Lights
Switch accent_light_switch “Accent Light Switch” {channel=“espmilighthub:rgb_cct:001:0xAE92:level”}
Dimmer accent_light_temp “Accent Light Temperature” {channel=“espmilighthub:rgb_cct:001:0xAE92:colourtemperature”}
Color accent_light_hue “Accent Light Hue” {channel=“espmilighthub:rgb_cct:001:0xAE92:colour”}
Dimmer accent_light_level “Accent Light” {channel=“espmilighthub:rgb_cct:001:0xAE92:level”, ga=“light”}

// Bedroom Room 3 - Bedside lights
Switch bed_light_switch “Bedside Light Switch” {channel=“espmilighthub:rgb_cct:001:0xAE93:level”}
Dimmer bed_light_temp “Bedside Light Temperature” {channel=“espmilighthub:rgb_cct:001:0xAE93:colourtemperature”}
Color bed_light_hue “Bedside Light Hue” {channel=“espmilighthub:rgb_cct:001:0xAE93:colour”}
Dimmer bed_light_level “Bedside Light” {channel=“espmilighthub:rgb_cct:001:0xAE93:level”, ga=“light”}

// Bedroom Room 4 - Stars
Switch stars_switch “Stars Switch” {channel=“espmilighthub:rgb_cct:001:0xAE94:level”}
Dimmer stars_temp “Stars Temperature” {channel=“espmilighthub:rgb_cct:001:0xAE94:colourtemperature”}
Color stars_hue “Stars Hue” {channel=“espmilighthub:rgb_cct:001:0xAE94:colour”}
Dimmer stars_level “Stars” {channel=“espmilighthub:rgb_cct:001:0xAE94:level”, ga=“light”}

and settings.json for the ESP8266 that I transferred over to the Pihub ( modified slightly to match settings that appear to be specific to the Pihub bridge)

{“admin_username”:“”,
“admin_password”:“”,
“ce_pin”:25,
“csn_pin”:8,
“reset_pin”:0,
“led_pin”:-2,
“radio_interface_type”:“nRF24”,
“packet_repeats”:200,
“http_repeat_factor”:1,
“auto_restart_period”:0,
“mqtt_server”:“192.168.11.98:1883”,
“mqtt_username”:“butteryak”,
“mqtt_password”:“XXXXXXX”,
“mqtt_topic_pattern”:“milight/commands/:device_id/:device_type/:group_id”,
“mqtt_update_topic_pattern”:“”,
“mqtt_state_topic_pattern”:“milight/states/:device_id/:device_type/:group_id”,
“mqtt_client_status_topic”:“”,
“simple_mqtt_client_status”:false,
“discovery_port”:48899,
“listen_repeats”:3,
“state_flush_interval”:10000,
“mqtt_state_rate_limit”:500,
“mqtt_debounce_delay”:500,
“mqtt_retain”:false,
“packet_repeat_throttle_sensitivity”:0,
“packet_repeat_throttle_threshold”:200,
“packet_repeat_minimum”:3,
“enable_automatic_mode_switching”:false,
“led_mode_wifi_config”:“Fast toggle”,
“led_mode_wifi_failed”:“On”,
“led_mode_operating”:“Slow blip”,
“led_mode_packet”:“Flicker”,
“led_mode_packet_count”:3,
“hostname”:“ML00”,
“rf24_power_level”:“MAX”,
“rf24_listen_channel”:“HIGH”,
“wifi_static_ip”:“192.168.11.111”,
“wifi_static_ip_gateway”:“192.168.11.1”,
“wifi_static_ip_netmask”:“255.255.255.0”,
“packet_repeats_per_loop”:10,
“home_assistant_discovery_prefix”:“”,
“wifi_mode”:“n”,
“default_transition_period”:500,
“rf24_channels”:[“LOW”,“MID”,“HIGH”],
“device_ids”:[2190,2191,2793,5306],
“gateway_configs”:,
“group_state_fields”:[“state”,“level”,“hue”,“saturation”,“mode”,“color_temp”,“bulb_mode”],
“group_id_aliases”:
{}}

Was not sure what exactly to modify or leave the same in settings.json for the Pihub bridge. seemed like the MQQT topics should match what the ESP had, anyway, any points to get this working with the sidohs milight binding same as the ESP would be greatly appreacited++

PS is the web UI available on your version?

Thanks much++ love the work you put into this++

Unfortunately, MQTT and WebUI is not included in the Raspberry Pi port, it’s only the UDP server. So I don’t think it’ll work with the ESPMilightHub Binding.

To connect the bulbs to the bridge, I just use the Mi-Light 3.0 app for iOS: ‎Mi-Light 3.0 im App Store

(there will be definitely an app for Android as well, and maybe also a webapp that you could install separately at the Raspberry Pi. Porting the ESP webapp would make no sense, too much effort, it’s much easier just trying an existing webapp für milight like GitHub - hanckmann/MiLight-Web: Simple web interface to control the MiLight or developing an own, if really needed. Anyhow, from the webapps out there, I didn’t test any, because I’m fine with the iOS app).

In openHAB, I just use the normal Milight Binding, this is my openHAB configuration:

Bridge milight:bridgeV6:milight1 "Milight Bridge 1" [ host="localhost", port=5987, repeat=1, bridgeid="00000000XXXX" ] {
	Thing rgbwLed 0 "Milight1 all colors" [zone = 0]
	Thing rgbwLed 1 "Licht Schlafzimmer" [zone = 1]
	Thing rgbwLed 2 "Licht Flur" [zone = 2]
	Thing rgbwLed 3 "Licht KĂĽche" [zone = 3]
	Thing rgbwLed 4 "Licht Eingang" [zone = 4]
}
Bridge milight:bridgeV6:milight2 "Milight Bridge 2" [ host="localhost", port=5988, repeat=1, bridgeid="00000000XXXX" ] {
	Thing rgbwLed 0 "Milight2 all colors" [zone = 0]
	Thing rgbwLed 1 "TV Kueche LED" [zone = 1]
	Thing rgbwLed 2 "Flaschen Wohnzimmer LED" [zone = 2]
}

This is my settings.json:

{
   "admin_username":"",
   "admin_password":"",
   "ce_pin":25,
   "csn_pin":8,
   "reset_pin":0,
   "led_pin":-2,
   "radio_interface_type":"nRF24",
   "packet_repeats":200,
   "http_repeat_factor":1,
   "auto_restart_period":0,
   "mqtt_server":"",
   "mqtt_username":"",
   "mqtt_password":"",
   "mqtt_topic_pattern":"milight/:device_id/:device_type/:group_id",
   "mqtt_update_topic_pattern":"milight/updates/:hex_device_id/:device_type/:group_id",
   "mqtt_state_topic_pattern":"milight/states/:hex_device_id/:device_type/:group_id",
   "mqtt_client_status_topic":"",
   "simple_mqtt_client_status":true,
   "discovery_port":48899,
   "listen_repeats":3,
   "state_flush_interval":10000,
   "mqtt_state_rate_limit":500,
   "mqtt_debounce_delay":500,
   "packet_repeat_throttle_sensitivity":0,
   "packet_repeat_throttle_threshold":200,
   "packet_repeat_minimum":3,
   "enable_automatic_mode_switching":false,
   "led_mode_wifi_config":"Fast toggle",
   "led_mode_wifi_failed":"On",
   "led_mode_operating":"Slow blip",
   "led_mode_packet":"Flicker",
   "led_mode_packet_count":3,
   "hostname":"ML00",
   "rf24_power_level":"MAX",
   "rf24_listen_channel":"LOW",
   "wifi_static_ip":"192.168.0.9",
   "wifi_static_ip_gateway":"192.168.0.1",
   "wifi_static_ip_netmask":"255.255.255.0",
   "packet_repeats_per_loop":20,
   "home_assistant_discovery_prefix":"homeassistant/",
   "wifi_mode":"n",
   "default_transition_period":500,
   "rf24_channels":[
      "LOW",
      "MID",
      "HIGH"
   ],
   "device_ids":[
		87578,
		37639
   ],
   "gateway_configs":[
      [
         
         87578,
         5987,
         6
      ],
	  [         
         37639,
         5988,
         6
      ]
   ],
   "group_state_fields":[
      "state",
      "brightness",
      "mode",
      "color_temp",
      "bulb_mode",
      "computed_color"
   ],
   "group_id_aliases":{
      "Schlafzimmer":[
         "fut096",
         87578,
         1
      ],
      "Flur":[
         "fut096",
         87578,
         2
      ],
      "KĂĽche":[
         "fut096",
         87578,
         3
      ],
      "Eingang":[
         "fut096",
         87578,
         4
      ],
      "TV Wohnzimmer LED":[
         "fut096",
         37639,
         1
      ],
      "Flaschen Wohnzimmer LED":[
         "fut096",
         37639,
         2
      ],
      "GW 2 Group 3":[
         "fut096",
         37639,
         3
      ],
      "GW 2 Group 4":[
         "fut096",
         37639,
         4
      ]
   }
}

gotcha+ yeah the web part of it is not so important, was mostly curious, just because it’s a good way to see if the ESP is working, independent of openhab.

I guess the real “no-go” here is really getting MQTT.

Right now the ESP version keeps what happens in openhab in sync with what one does with the remote via MQTT, was hoping to find something that works like the ESP version, but with ethernet.

thanks though, maybe I’ll look at the code a bit, but it’s most likely way above my abilites++

appreciate your input++