This is a thread to discuss ideas for a first time user wizard for openHAB inspired by Yannick’s post in another thread quoted here
Other ideas about how to make openHAB less complex to use can also be discussed
such as Sebastian’s idea to make a smart dialog box to install binding
which was a response to my post about adding auto discovery quoted here
I think unrealistic expectations are a common issue we run into with many new users. I’ve suggested to a lot of new people that they take a step back from their ultimate goal and start with a WiFi outlet/bulb.
In the past, I’ve suggested that we define expertise levels that users have to unlock. They would be able to unlock whenever they want, so it’s not about preventing them from access. It’s more about communicating that what they want to do might be harder than they expect it to be. Walk before you run.
We’re already kind of doing this with the “Show Advanced” button in MainUI, but I’d put whole features behind intermediate/advanced/expert(?) walls.
The benefit for new users is that they’ll have a simpler UI to wrap their heads around at first, and can go to the next level when they feel they’re ready, whether that’s Day 1 or Day 300.
We could also just start labelling different features/bindings–anything to convey when things are about to get more difficult. For an easy example, the “JSON 3rd Party Add-on Service” feature could be labelled as an intermediate feature. It’s a little much for a beginner, but relatively easy once you’re familiar with the basics.
Is this our current first time user addon wizard?

I don’t like that there is a shopping cart next to ‘Select Add-ons to Install’ link. It makes it look like the Add-ons are going to cost money
placed here for reference
That should be easy to change, just open an issue at webui repos with this change request. There is already a PR for the addon store under administration ( https://github.com/openhab/openhab-webui/pull/2053)
This is a link to my PR
It was just an icon and I removed it from the page
It would be really nice, if this wizard isn’t just for first time user, but one that can be invoked every time someone wants to add something.
Just a little off on a tangent here…
I think that is good advice and I’ve read you telling folks that several times.
Wifi devices have several good advantages, easy to set up, cheap…
But I have one little tiny issue with pushing new folks toward WiFi
Here is the scenario
New guy buys WiFi plug. Gets it working in openHAB. Writes some rules, finds the joy of home automation, buys a few more WiFi devices… then, mysteriously and randomly, things stop working consistently. The kids complain their device are getting bumped off or their game is lagging. That $90 router that has done fine for years can’t handle 20 or 30 connections. These are not easy to diagnose problems and often random enough that openHAB gets blamed
I like WiFi devices, I own Shelly, Tp-Link, LifX light
I also have a $300 Dual Band Gigabit Wireless Internet Router that has 6 antennas and looks like a mini alien spaceship ![]()
Suggesting WiFi IMHO, maybe should come with a caveat: requires a good home WiFi network
Maybe in the process of creating that skeleton, a new user is led through the “Add Equipment to Model” and “Create Equipment from Thing”. If the user wants to add a light bulb or a wall switch a drop down presents options or search and install bindings?
All the while explaining the openHAB parlance
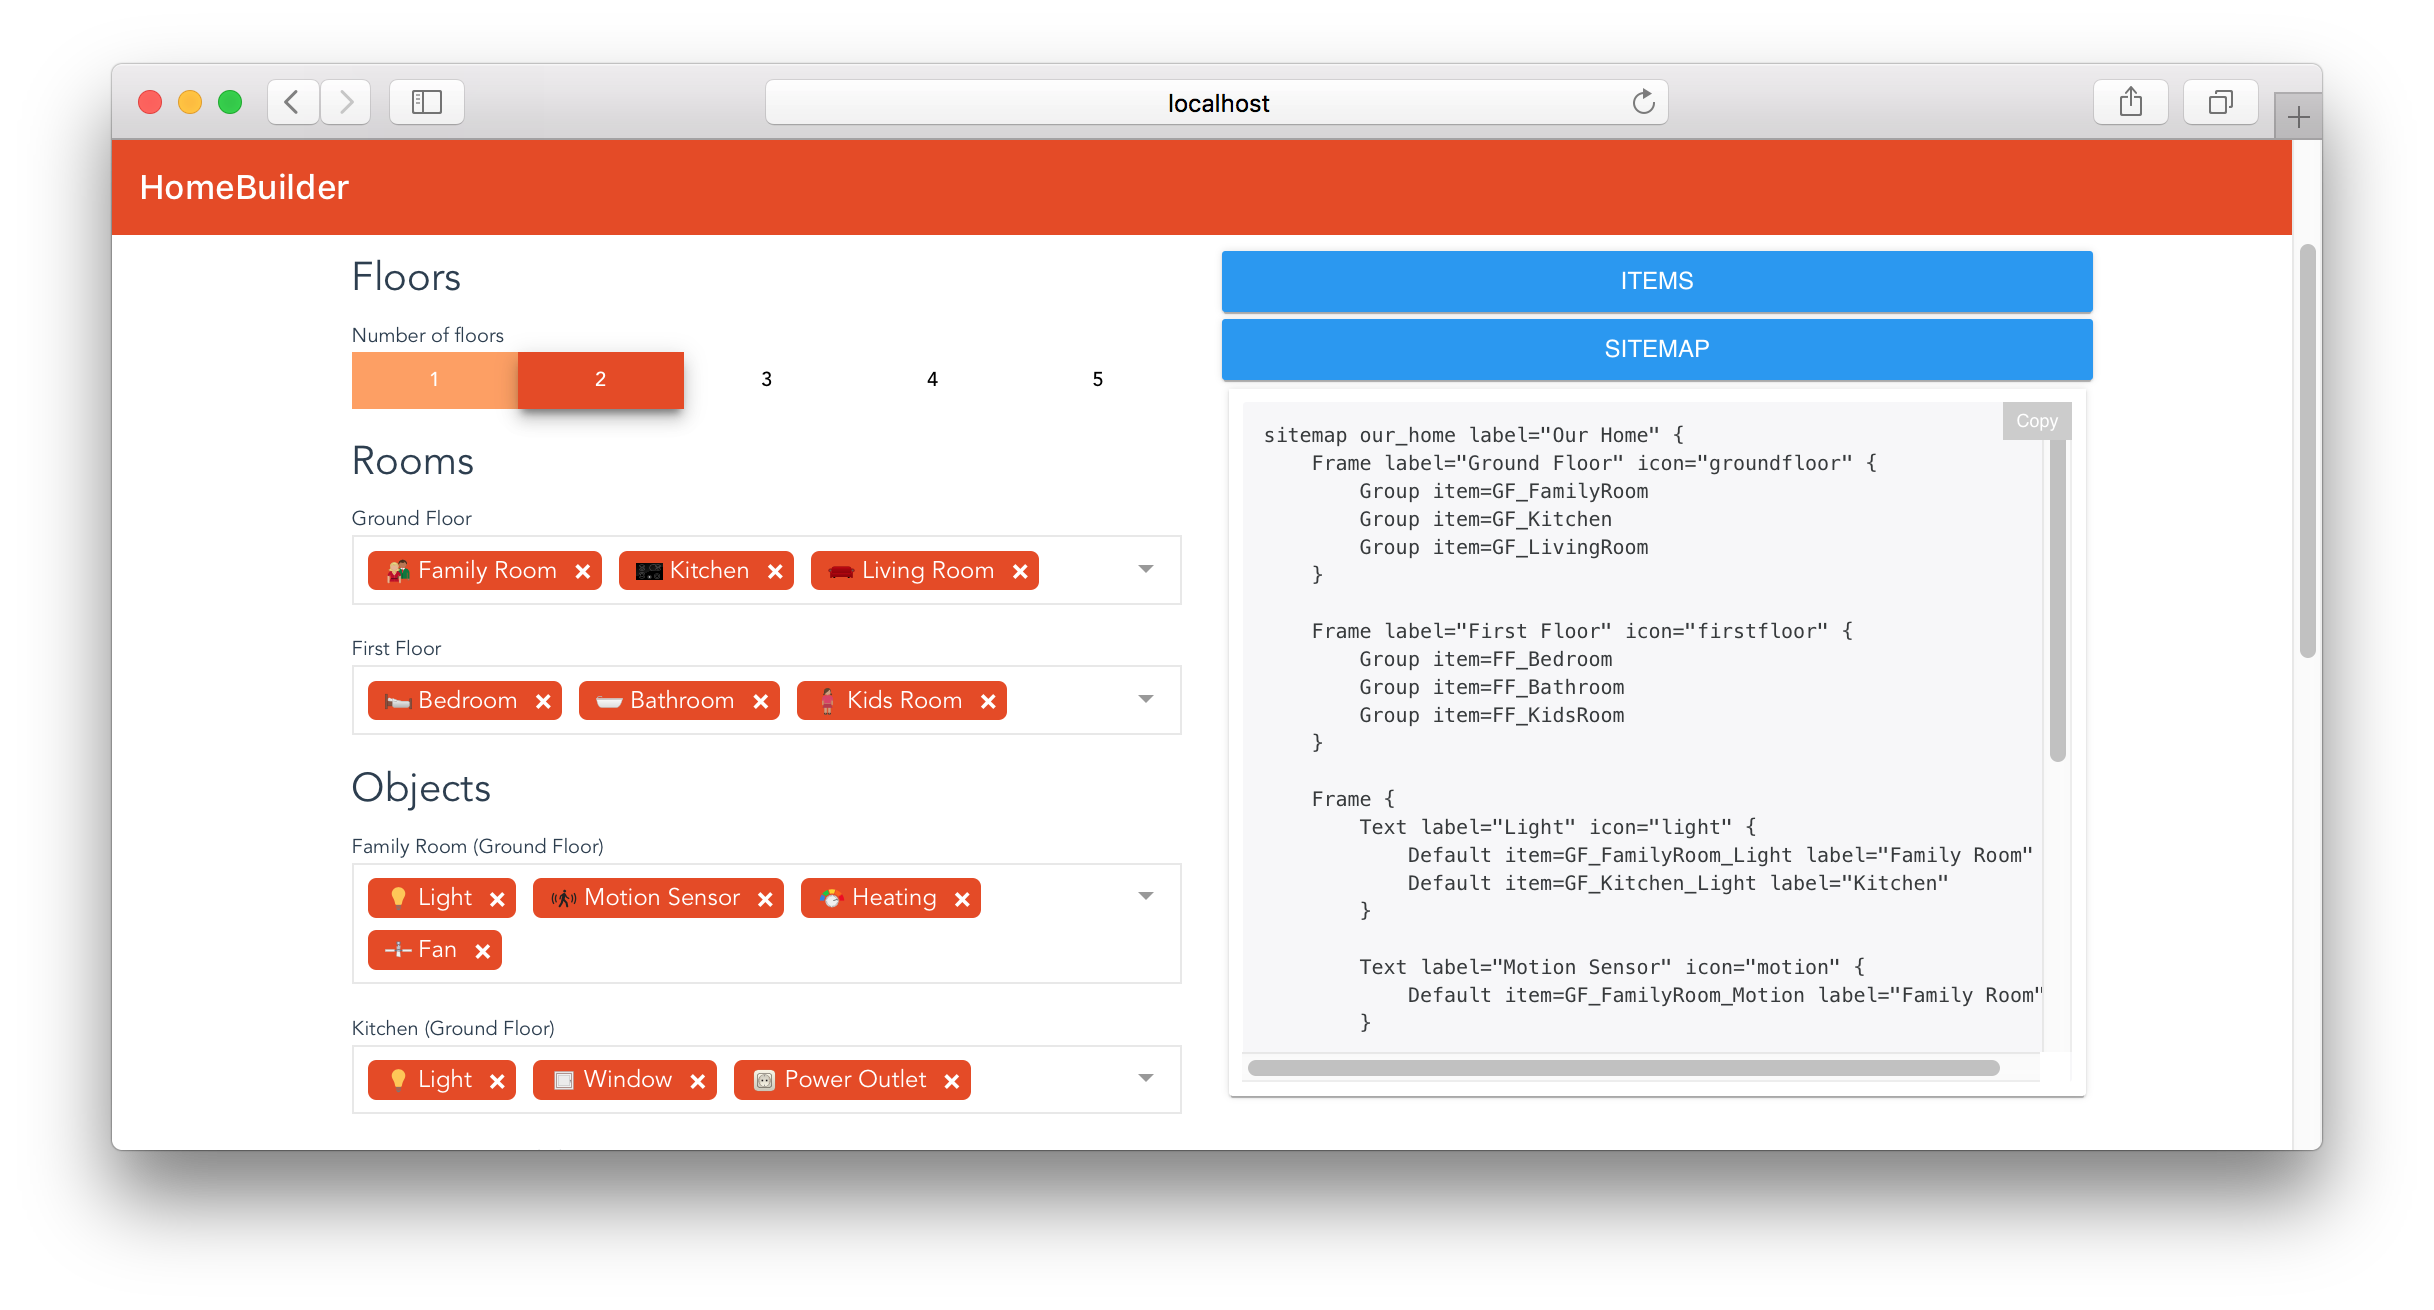
Hey for anyone who wasn’t around back when 2.2 came out
Here is the home builder
I agree but as Yannick said ‘There’s a first-time user wizard, but it’s deliberately kept to the bare bones because it might annoy if you stretch it too much.’
I could see an advanced user really being annoyed by the wizard.
So, in my opinion, from the very first screen, there needs to be a checkbox at the bottom, I am an advanced user, get this bloody stupid thing out of my face never to be seen again
And then, maybe a little wizard icon in the corner of various cards, maybe a little wizard cap or magic wand that can invoke the wizard anytime.

It would also be good if we changed the description. By the time where a new user installs openHAB he might not yet be familiar with our terminology. I would never think of an interface if I hear the term „Add-on“. Yes, I know, add-on includes scripting languages, transformations, persistency services, etc, etc. but at this stage, we want the user primarily to install an interface, right?
Suggestion: Something like
Install Add-ons
openHAB Add-ons are (amongst others) interfaces which integrate your existing home automation devices such as lightbulbs, rollershutters, sensors, weather services, etc. Simply search for a vendor name (Philips, Shelly or a generic integration like ZigBee, Z-Wave, KNX, MQTT).
IMO, interface and add-on are both equally “jargony” to me. One word that most people are familiar with is Adapter.
I agree with you, but I wouldn’t overstate the “20 or 30 connections”. That typically refers to concurrent connections, and WiFi automation devices don’t need to stay connected or move a lot of data. That’s why they’re almost always on the 2.4GHz band. If a router could only handle up to 30 devices, it wouldn’t give you 254 IP addresses to throw around.
I think you run into problems with WiFi automation devices when they’re struggling to communicate with the router, because they’ll keep trying to connect and flap online/offline. But that’s just my personal observation from my network (I had to install a mesh router/AP to get around a dead zone created by my refrigerator).
Of course, the same thing happens with Zigbee/Z-Wave, which is why we tell people to get AC-powered devices that can serve as repeaters. Heck, I had to do that for my Zigbee devices (again because of the refrigerator).
The reality is that every WiFi network is 100% unique due to its surrounding environment, with all sorts of unknown factors causing problems. That’s why diagnosing WiFi problems is such a pain in the ass, and why you get Reddit threads where people are adamantly on one side or the other.
In the end, my recommendation is for someone to start with something that’s easy and cheap: a WiFi outlet/bulb that will usually cost between $10-20 and simply plugs in. I’m not going to tell them to jump into Z-Wave or Zigbee due to the added cost/difficulty. It’s just about getting them a quick win to accelerate the learning.
This is also why I’m frustrated by Matter being–to this point–an utter failure. The promise of Matter is that people will spend less time installing devices and more time using them, but companies are ruining it.
Fine if you want to suggest that people have good WiFi networks, but I would say that for anyone regardless of their home-automation systems.
It shouldn’t be hard to add it somewhere. Maybe under Help and About?
It might need to be made smarter to handle recognize what is already installed on those subsequent runs.
There is already an issue open to add detection of devices and suggest bindings to the wizard.
I have read, or at least glanced through the related threads. I’m going to comment here for two reasons, one, it is mercifully short and two, I like personally like the approach.
I would build on the beginner, novice, advanced, expert idea. I’m thinking “wizards”, not wizard.
Prior to facing a blank OH UI like today, a questionnaire could determine what technologies the person has in mind. There would be a library of post-install scripts (or nothing for an expert) that could prepopulate the UI.
Example: I’m a recent convert to Docker (could be overly excited, we’ll see). Unrelated to the topic here I recently shutdown my bare metal installation of openhabian (it wasn’t doing much anymore), installed Docker and had the latest OH milestone up and running in less than an hour. Related to the wizard, OH Docker has this screen in the startup script (different from the one above).

The other thing I would like to build on is the template/example idea mentioned. My learning method is largely finding something that works and copying (modify as necessary).
Example: What I did from the screen above was to add the Systeminfo binding, (+) added the local computer, went to the channels tab and added the CPU%. Rhetorically, who wouldn’t want that if it was provided by a script? Now there is a thing, channel and item to see how it all works. Going further, it could add a label card of the CPU% to the overview tab. I was also thinking that simple JS scripts could be added, like to turn on a light build from a motion sensor.
My two cents
That comes up for any new OH install regardless of how it’s installed. You saw that because you didn’t upgrade an existing config nor restore your configs from the bare metal instance to the Docker instance. So you got to experience the new user experience.
The differences may be an OH 3 vs. OH 4 as there were a number of minor changes made to the wizard for OH 4. In OH 3 Nashorn JS and rrd4j comes with OH out of the box and in OH 4 they are merely recommended as part of the wizard.
Thanks Bob for weighing in on this topic
Stefan, hmerk and florian are in the middle of revamping the UI icons and the idea that the shopping cart connotes $$$ has be realized and is being addressed but please feel free to join in the conversation
One of the pieces that I am intending to include in the help sidebar that I proposed in the marketing thread is a simple quick start series of steps to get a new user from 0 to first widget. This is not intended as a replacement for the getting started tutorial. It offers little to no understanding but just a series of clicks (with many places that encourage the user to actually go to and interact with the getting started tutorial or docs in general).
Here’s what I’ve got so far:
- Install a Binding (Add-on)
- Addon-Store Left panel > Settings > Add-on Store or click here (links directly to Add-on Store)
- Install Scroll to the Binding you need and click the install button
- More help on Bindings (button that links to addon docs)
- Add a Thing
- Thing Inbox Left panel > Settings > Things > Inbox or click here (links directly to Thing Inbox page)
- New Thing Click the blue + button in the lower-right corner
- Choose Binding Click on the listing of the Binding for the Thing you want to add to openHAB
- Scan Click the blue Scan button to automatically search for related devices
- Add Thing Select the device from the list of Discovered Things and Click OK to add the Thing
- More help on Things (button that links to things section of Getting Started)
- Configure the Thing
- Thing List Left panel > Settings > Things or click here (links directly to Thing List page)
- Select Thing Click on the listing for the Thing you want to configure
- Configuration Follow the documentation for the Thing’s Binding to add configuration then click Save in upper right-hand corner
- Binding Documentation (button that links to start page of the Add-ons docs)
- Create an Item
- Thing List Left panel > Settings > Things or click here (links directly to Thing List page)
- Select Thing Click on the listing for the Thing you want to interface with
- Channels Click on the Channels tab in the center at the top of the Thing Page
- Select Channel Click to expand the Channel you will control and then click Add Link to Item
- New Item Select the Create a new Item option
- Add Item Click the blue Link button at the bottom of the page
- More help on Items (button that links to Items Configuration docs)
- Display Item in UI",
- Select Page from Page List Left panel > Settings > Pages > Overview or click here (links directly to the Overview page editor)
- Add Block, Row, and Column Click on the Add Block, Add Row, and Add Column buttons in the editor
- Add Widget Click the gray rectangle and select a card appropriate for the intended item (for example, a toggle card for a switch item)
- Configure Widget Click the black menu button above the right corner of the widget and select Configure Widget
- Select Item Click on the Item field and select an appropriate item from the list then click Done
- Save Page Click Save in the upper right corner of the editor
- View Home Page Click here to return to the Home Overview Page
- More help on UI pages (button that links to Tutorial Pages Intro)
Here’s what one of the steps looks like in the helper bar:

What does everyone think? To little too much? Comments and edits are welcome.
Short of actually doing all these steps for one binding, one thing, one item, one widget for a noncontroversial binding like systeminfo, I like this very much.
The only thing that gives me pause is the “developer” sidebar. It took me a while and several forum posts before I clicked “Developer Tools”, then under “Maintenance Tools”, then switch on “Developer Sidebar” then figure out what all the icons meant. I could see this pop up right after “Install Addons” and be called “First time Wizard”, then be available later as a sidebar option.
That is also one of the additions that I’m working on. It will be open by default on the new installation page.
There will also be a new help button on the navbar for most pages that will open up the side bar directly to the help pages, but will make the dev tools in general more prominently visible:
