How to build a redundant and resilient Thread network for Matter with OpenThread
Summary — Read This First
Thread and Matter provide a secure, IPv6-based, self-healing mesh that can be significantly more robust than legacy smart-home protocols — if designed intentionally.
For small setups with few devices, commercial Matter hubs and GUIs work well and hide most complexity.
For larger installations (dozens of devices, multiple floors, multiple Border Routers), that abstraction becomes a limitation.
This guide documents a hands-on, OpenThread-based approach: explicit Thread datasets, multiple OTBRs, IPv6 and mDNS verification, correct commissioning flows, and RF planning — treating Thread as infrastructure rather than a black box.
When this approach may not be appropriate:
If you want plug-and-play only, run very few devices, rely on a single proprietary hub, or are unwilling to deal with IPv6/CLI concepts, Thread may add unnecessary complexity.
If you care about redundancy, scalability, vendor independence, and predictable behaviour, this approach is worth the effort.
How to Build a Redundant and Resilient Thread Network for Matter with OpenThread
After many years of operating Z-Wave devices, it became clear that any new hardware should be deployed on a modern wireless stack—while continuing to coexist with the existing OpenHAB installation. With the arrival of affordable Matter-over-Thread devices from IKEA and other vendors, and with the Thread and Matter software stacks finally reaching operational maturity, it is now possible to deploy a redundant, resilient, self-configuring mesh network for home automation.
Thread as a networking layer, combined with Matter as the application layer, is a fundamental shift in IoT home automation. An estimated 2.5–4.0 million engineering hours have gone into the specification, development, reference implementations, interoperability testing, and certification processes coordinated by the Thread Group. This investment shows: the resulting system offers exceptional robustness and flexibility.
That said, this power comes with significant underlying feature-heavy complexity. In commercial off-the-shelf hubs, most of this complexity is intentionally hidden from the user. Unfortunately, these hubs typically do not expose the configuration and tuning options required to build a truly redundant and resilient Thread network—especially across larger or more complex premises. Interoperability between hubs from different major vendors is also often incomplete, leading to frustrating onboarding and connectivity issues (see e.g. https://www.theverge.com/tech/873973/ikea-matter-thread-smart-home-connectivity-issues). Documentation is frequently sparse or misleading, so this post is intentionally written in a tutorial style.
For that reason, we build the network using modular hardware and open-source software stacks. As a prerequisite a solid foundation in Linux and basic networking, including regular use of the command line CLI, is required. A Linux host system (for example Ubuntu) is strongly recommended over Windows. To survive the inevitable configuration hell on your specific setup, a modern code assistant (Claude, ChatGPT, Copilot, Gemini, etc.) is extremely helpful—unless you already possess very deep Linux expertise.
Thread Network Architecture — High-Level Overview
Thread is a low-power, IPv6-based wireless mesh networking protocol designed for secure and reliable IoT and smart-home deployments. It is explicitly optimised for constrained devices while preserving full end-to-end IP interoperability.
The key architectural advantages of Thread are:
-
Native IP networking (no gateways or protocol translation inside the mesh)
-
Self-healing, self-configuring mesh topology
-
Mandatory, built-in security
-
Very low power operation
-
Scalability to dozens or hundreds of nodes
-
Explicit support for always-on infrastructure devices
Thread’s architecture is composed of several well-defined layers.
1. Physical & MAC Layer
This layer defines how bits are transmitted over the air and is shared with other low-power wireless protocols such as Zigbee.
IEEE 802.15.4
-
Frequency band: 2.4 GHz ISM (globally available)
-
Data rate: 250 kbps
-
Topology support: star and mesh
Key characteristics:
-
Very low power consumption
-
Short packet sizes
-
CSMA-CA channel access
-
AES-128 hardware encryption support
2. Network & Adaptation Layer
This layer enables native IPv6 communication on links with very small packet sizes.
6LoWPAN
Thread uses 6LoWPAN to adapt IPv6 for constrained wireless links:
-
IPv6, UDP, and ICMP header compression
-
Fragmentation and reassembly
-
Efficient multicast handling
3. Network Layer
IPv6
-
Every Thread device has a globally unique IPv6 address
-
No NAT or address translation is required inside the mesh
-
Enables direct IP routing to and from external networks
Routing
-
Based on Mesh Link Establishment (MLE)
-
Fully self-configuring and self-healing
-
Automatic Leader election
4. Transport Layer
UDP over IPv6
-
Thread exclusively uses UDP (TCP is not supported)
-
Optimised for low latency and minimal overhead
-
Reliability is handled at the application layer when required
5. Security Architecture
Security is enforced at multiple layers and cannot be disabled.
Thread security is mandatory and end-to-end:
-
Network-wide AES-128 keys for link-layer encryption
-
Device-specific credentials during commissioning
-
Secure bootstrapping using DTLS
-
No implicit trust in the radio medium
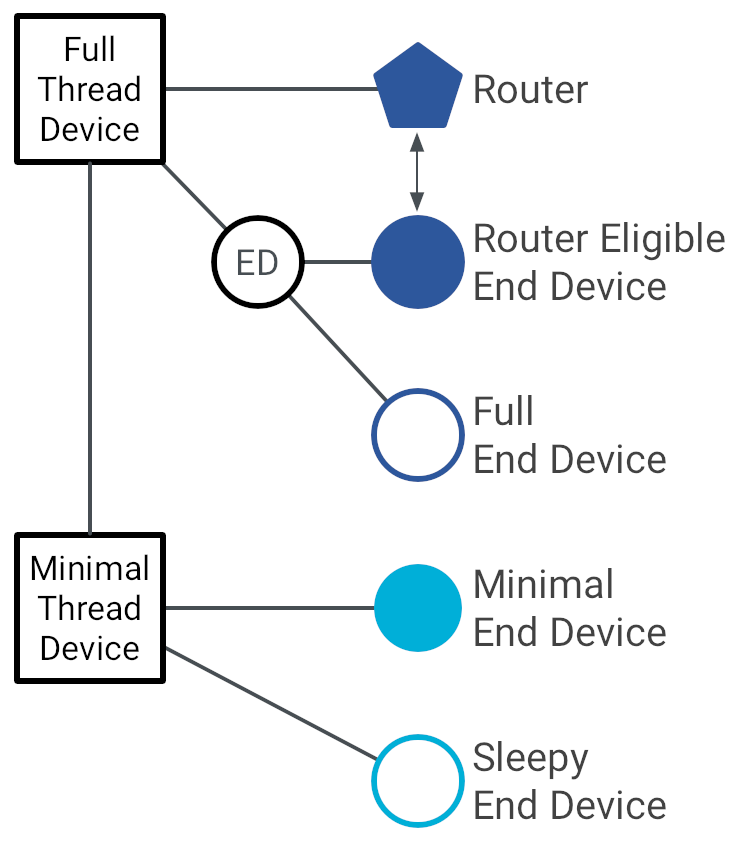
6. Device Roles in a Thread Network
Most consumer devices—such as IKEA or Aqara sensors and switches—are battery-powered Sleepy End Devices (SEDs). This is an important distinction: SEDs are not permanently connected to the network. They wake up periodically to communicate with their parent router and cannot be contacted asynchronously.
| Thread Role | Description |
|---|---|
| Leader | Maintains network parameters and routing information |
| Router | Forwards packets and supports child devices |
| REED (Router-Eligible End Device) | Can be promoted to router dynamically |
| End Device (ED) | Reduced functionality, no routing |
| Sleepy End Device (SED) | Ultra-low power, polls parent periodically |
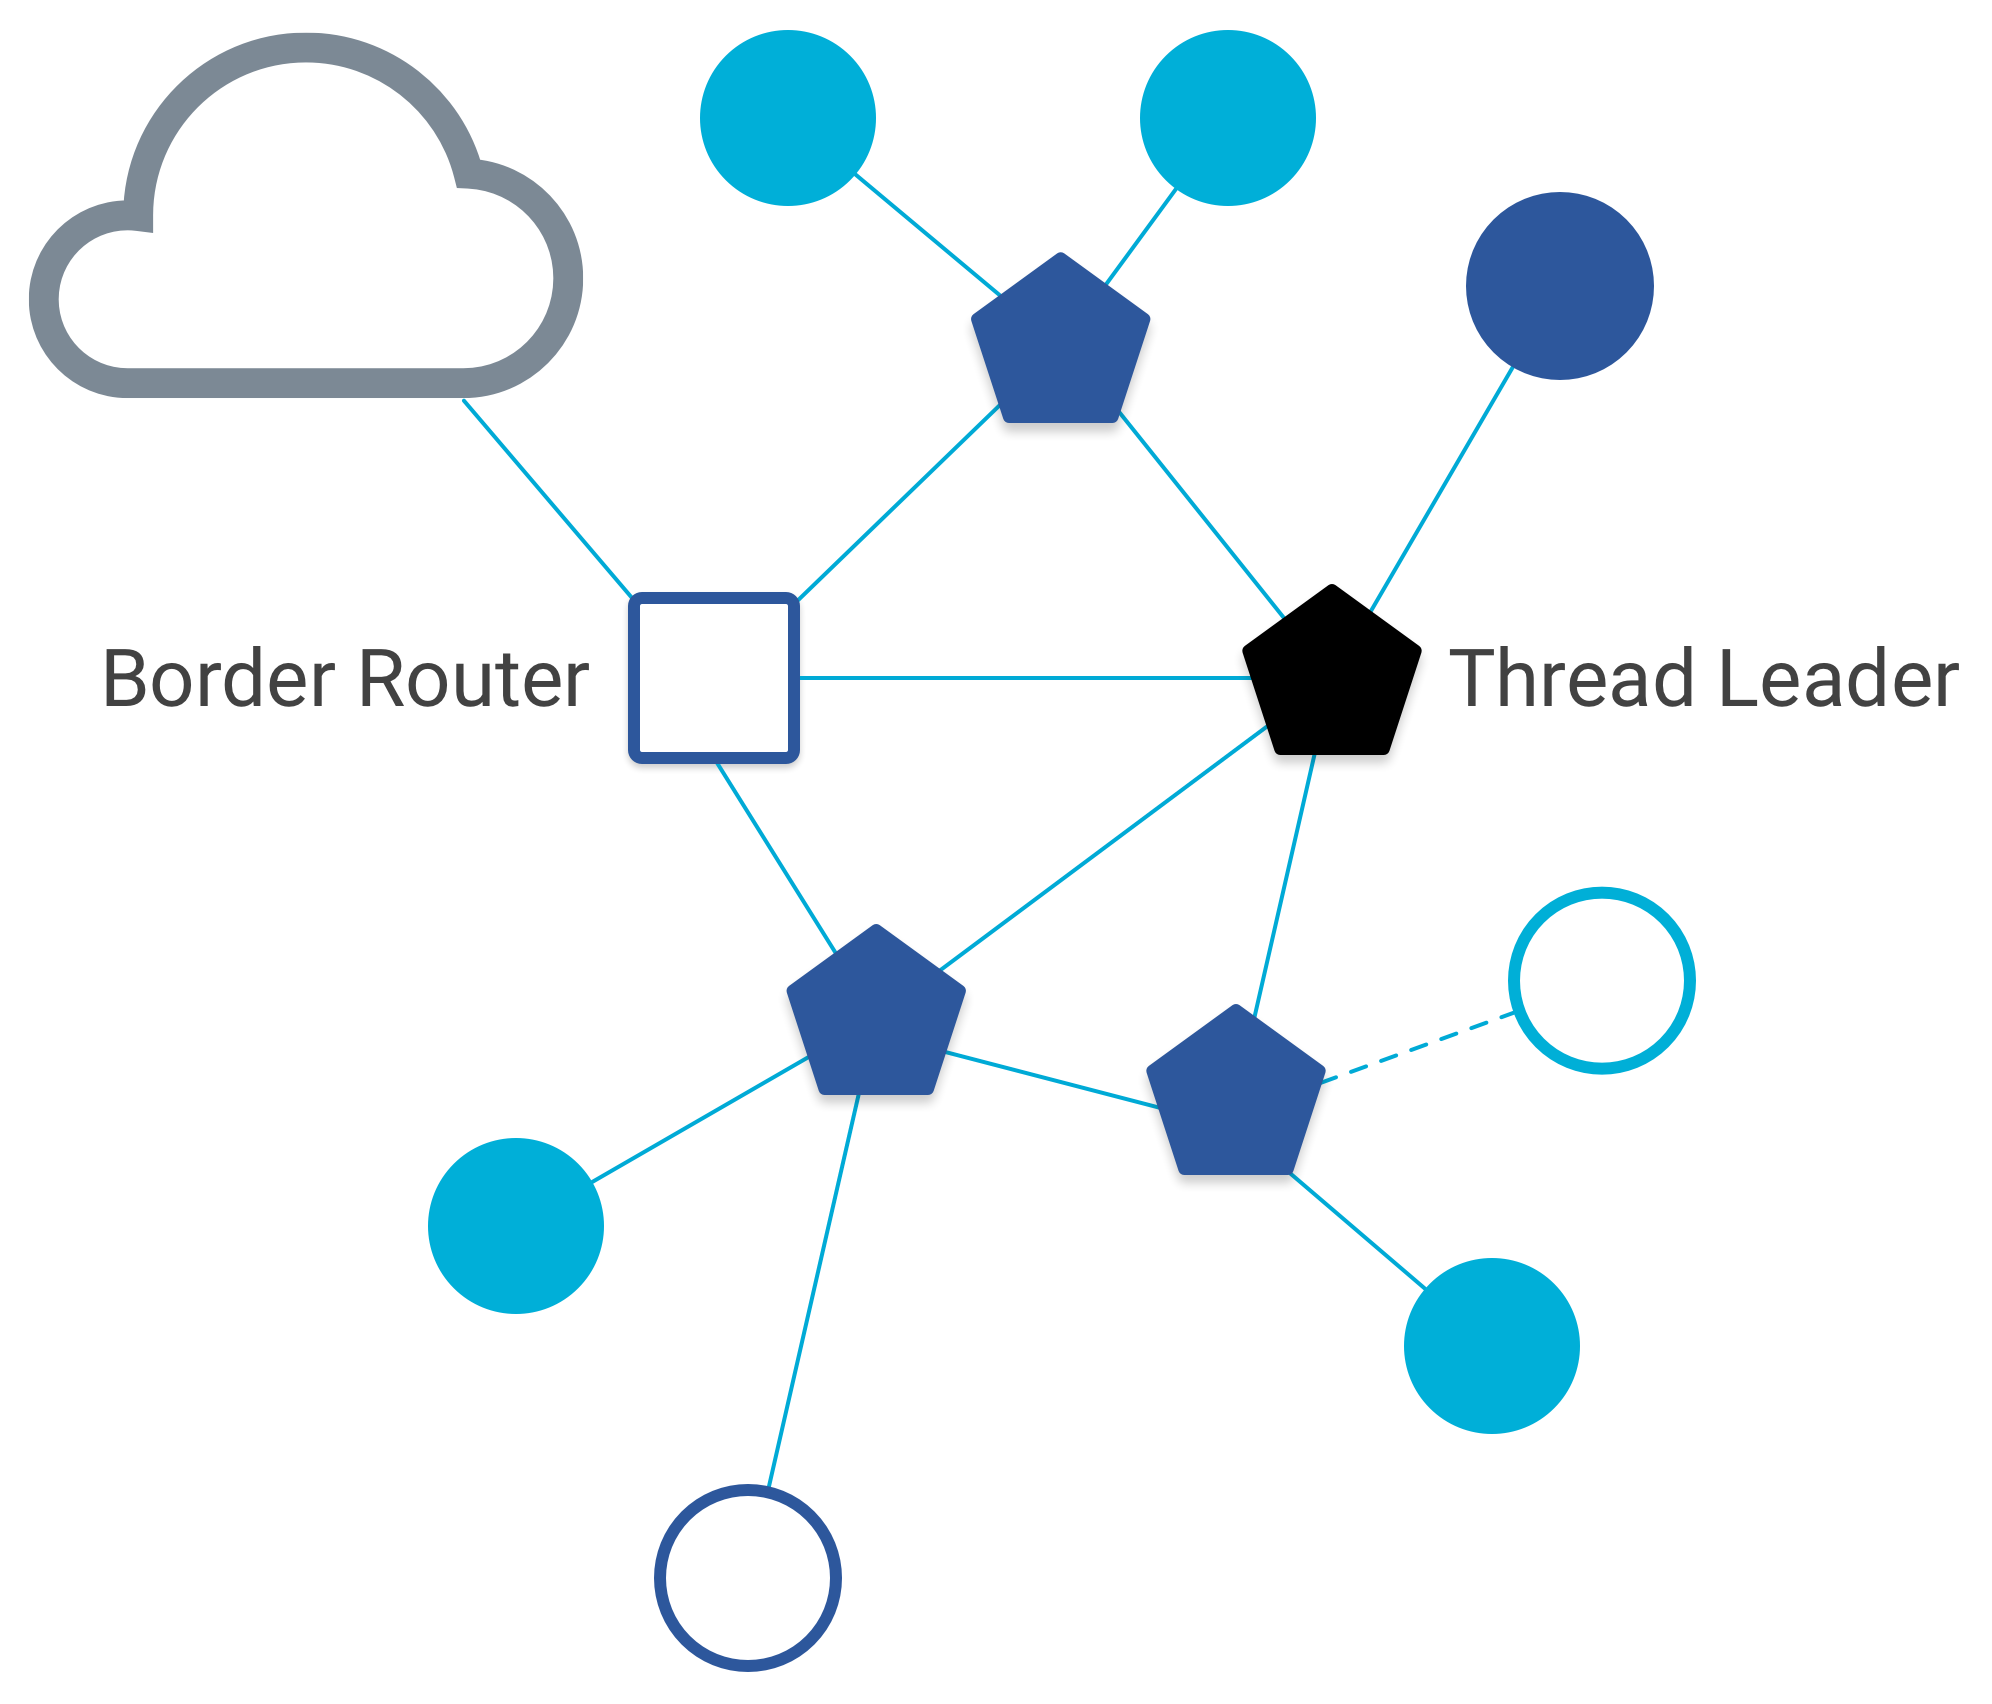
| Border Router | Connects Thread mesh to Ethernet/Wi-Fi/IP backbone |
There is no single point of failure: if the Leader disappears, a new one is elected automatically.
7. Border Router & External Connectivity
A Thread Border Router (OTBR) provides connectivity between:
-
Thread ↔ Ethernet / Wi-Fi
-
IPv6 ↔ IPv6 (no protocol translation)
-
Multicast DNS (mDNS) and service discovery
Typical implementations run on Linux-based systems or dedicated embedded gateways.
8. Application Layer & Ecosystem
Matter
Thread itself does not define an application layer. Instead, it is typically paired with:
-
Matter (the preferred modern standard)
-
Custom CoAP-based applications
-
Proprietary UDP-based services
Matter over Thread provides:
-
Vendor-agnostic interoperability
-
Standardised device models
-
Secure commissioning and lifecycle management
-
Isolation from Thread network details
Our Resilient Home Network Topology
At its core, a minimal Thread deployment consists of one Thread Border Router (OTBR). The Border Router connects the Thread mesh on one side to the existing IPv6-capable home IP network (Ethernet or Wi-Fi) on the other. From the perspective of higher layers, Thread is simply another routed IPv6 segment.

If OpenHAB is already running on a Raspberry Pi, the OpenThread Border Router can coexist on the same hardware without issue. In that case, no additional host system is required—only a dedicated Radio Co-Processor (RCP) is added. The RCP is typically connected via USB and operates independently of OpenHAB.
No vendor specific cloud connection is needed. All data stays on premise and is persisted already locally in OpenHAB.
This setup integrates cleanly alongside existing radio stacks. A Raspberry Pi can simultaneously host:
- Z-Wave USB controllers
- Zigbee coordinators
- A Thread RCP
In addition, some modern radio dongles support dual-stack operation, allowing Thread and Zigbee to run in parallel on the same hardware, provided the firmware and driver support are appropriate.
The resulting topology is simple, modular, and extensible—forming the foundation for building redundancy and resilience in later stages.
Limited Radio Coverage of Thread
Thread operates in the 2.4 GHz ISM band and uses significantly lower transmit power than Sub-GHz technologies such as Z-Wave. In practice, a single Z-Wave hop typically covers roughly 2–3× the indoor distance of a single Thread hop involving a Sleepy End Device (SED). Thread compensates for this limitation by design through dense mesh routing and a higher expected density of routers.
Thread radio transmit power is typically configurable in the range of 0 dBm (1 mW) to +8 dBm (≈6.3 mW), depending on hardware and regulatory constraints. For initial deployments, starting at +8 dBm is recommended to maximise link margin during network formation.
Typical Indoor Radio Characteristics
| Metric (typical) | Thread / Matter (SED) | Z-Wave (700/800 series) |
|---|---|---|
| Frequency band | 2.4 GHz | Sub-GHz (EU ~868 MHz / US ~908 MHz) |
| PHY | IEEE 802.15.4 O-QPSK | FSK / GFSK |
| TX power (typ.) | 0 to +8 dBm | +10 to +14 dBm |
| RX sensitivity (typ.) | −100 to −102 dBm | −102 to −106 dBm |
| Single-hop indoor range | 8–15 m | 20–40 m |
| Through 2–3 walls | Marginal → OK | Usually OK |
| Battery device duty cycle | Very low (polling) | Low–moderate |
| Mesh reliance | High (by design) | Moderate |
In real-world residential environments this typically means:
-
Excellent performance in the same room
-
Reliable connectivity to adjacent rooms
-
Unreliable links through 2–3 walls without a nearby router
Thread therefore assumes that mains-powered routers are placed densely—typically every 5–10 m indoors. Battery-powered sensors (SEDs) are explicitly not intended to act as long-range nodes.
Thread is optimised for low power consumption and dense meshes, making it ideal for homes with many permanently powered devices. Conversely, it is initially a poor choice for sparse deployments with isolated long-range sensors and few routers.
Router Density as the Primary Design Lever
The practical solution is straightforward, but essential for network coverage:
Deploy as many mains-powered Thread routers (not Border Routers) as necessary to achieve full radio coverage across the premises. Practically this means install some smart plugs or lightbulbs, which can act as REED router eligible end devices. The offering from different vendors is expanding (e.g. Eve Energy, IKEA GRILLPLATS & TOFSMYGGA). Distribute these REEDs across your premise, even if you don’t need the switching function.
All End Devices (EDs and SEDs) attach to nearby routers, which forward traffic through the mesh toward one or more Border Routers that connect the Thread network to the home IP backbone.

With sufficient router density, the Thread mesh dynamically adapts:
-
Routes are recalculated when devices move
-
Traffic is rerouted when routers fail
-
Changes in link quality are handled automatically
However, this resilience only works if all routers belong to the same Thread network—that is, they must share identical network credentials. This requirement is often difficult or impossible to satisfy when using proprietary hubs from different vendors, and is a major reason for building a unified, open Thread infrastructure.
Leader Election, Partitions, and Resilience
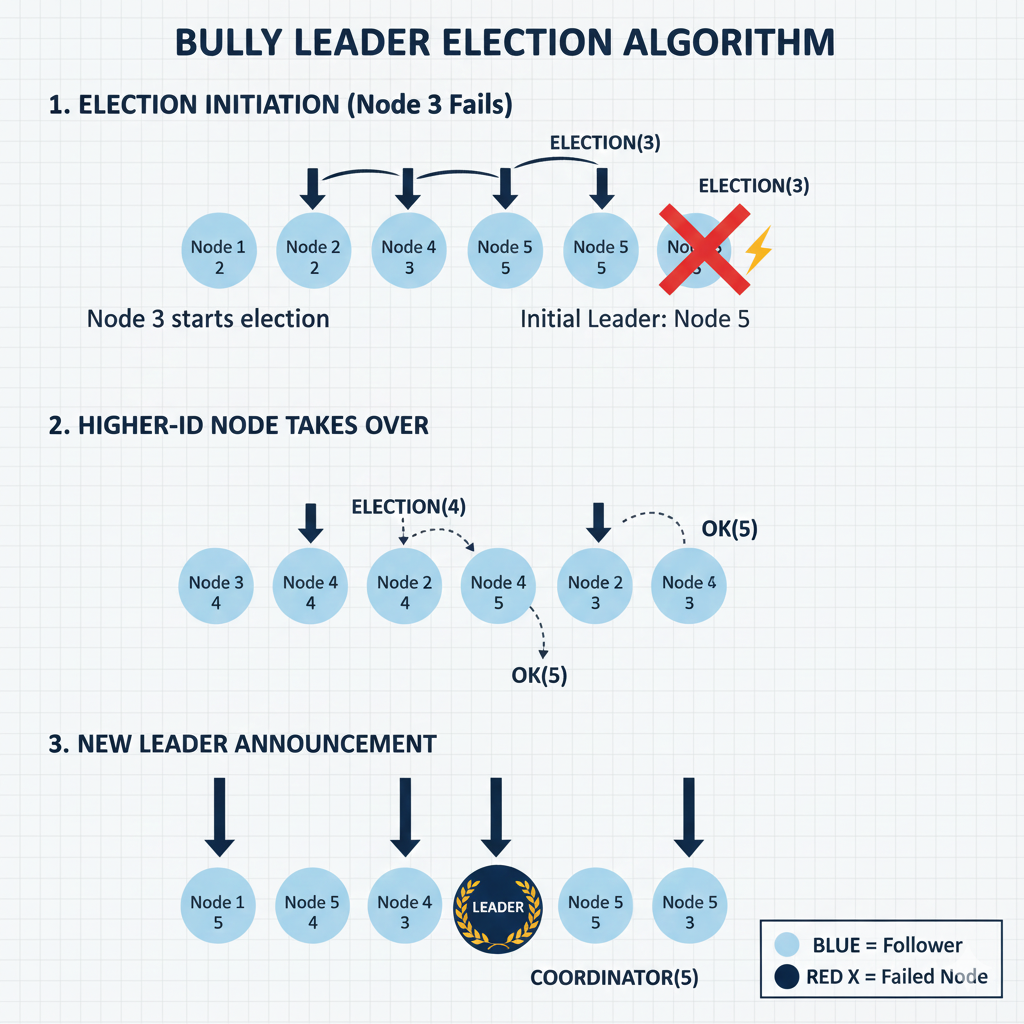
Each Thread network dynamically elects a Leader, responsible for maintaining network-wide parameters. If the Leader disappears, another router takes over automatically.
If connectivity between routers is lost, the network may temporarily split into multiple partitions, even when credentials are identical. Each partition elects its own Leader, reducing redundancy until connectivity is restored.
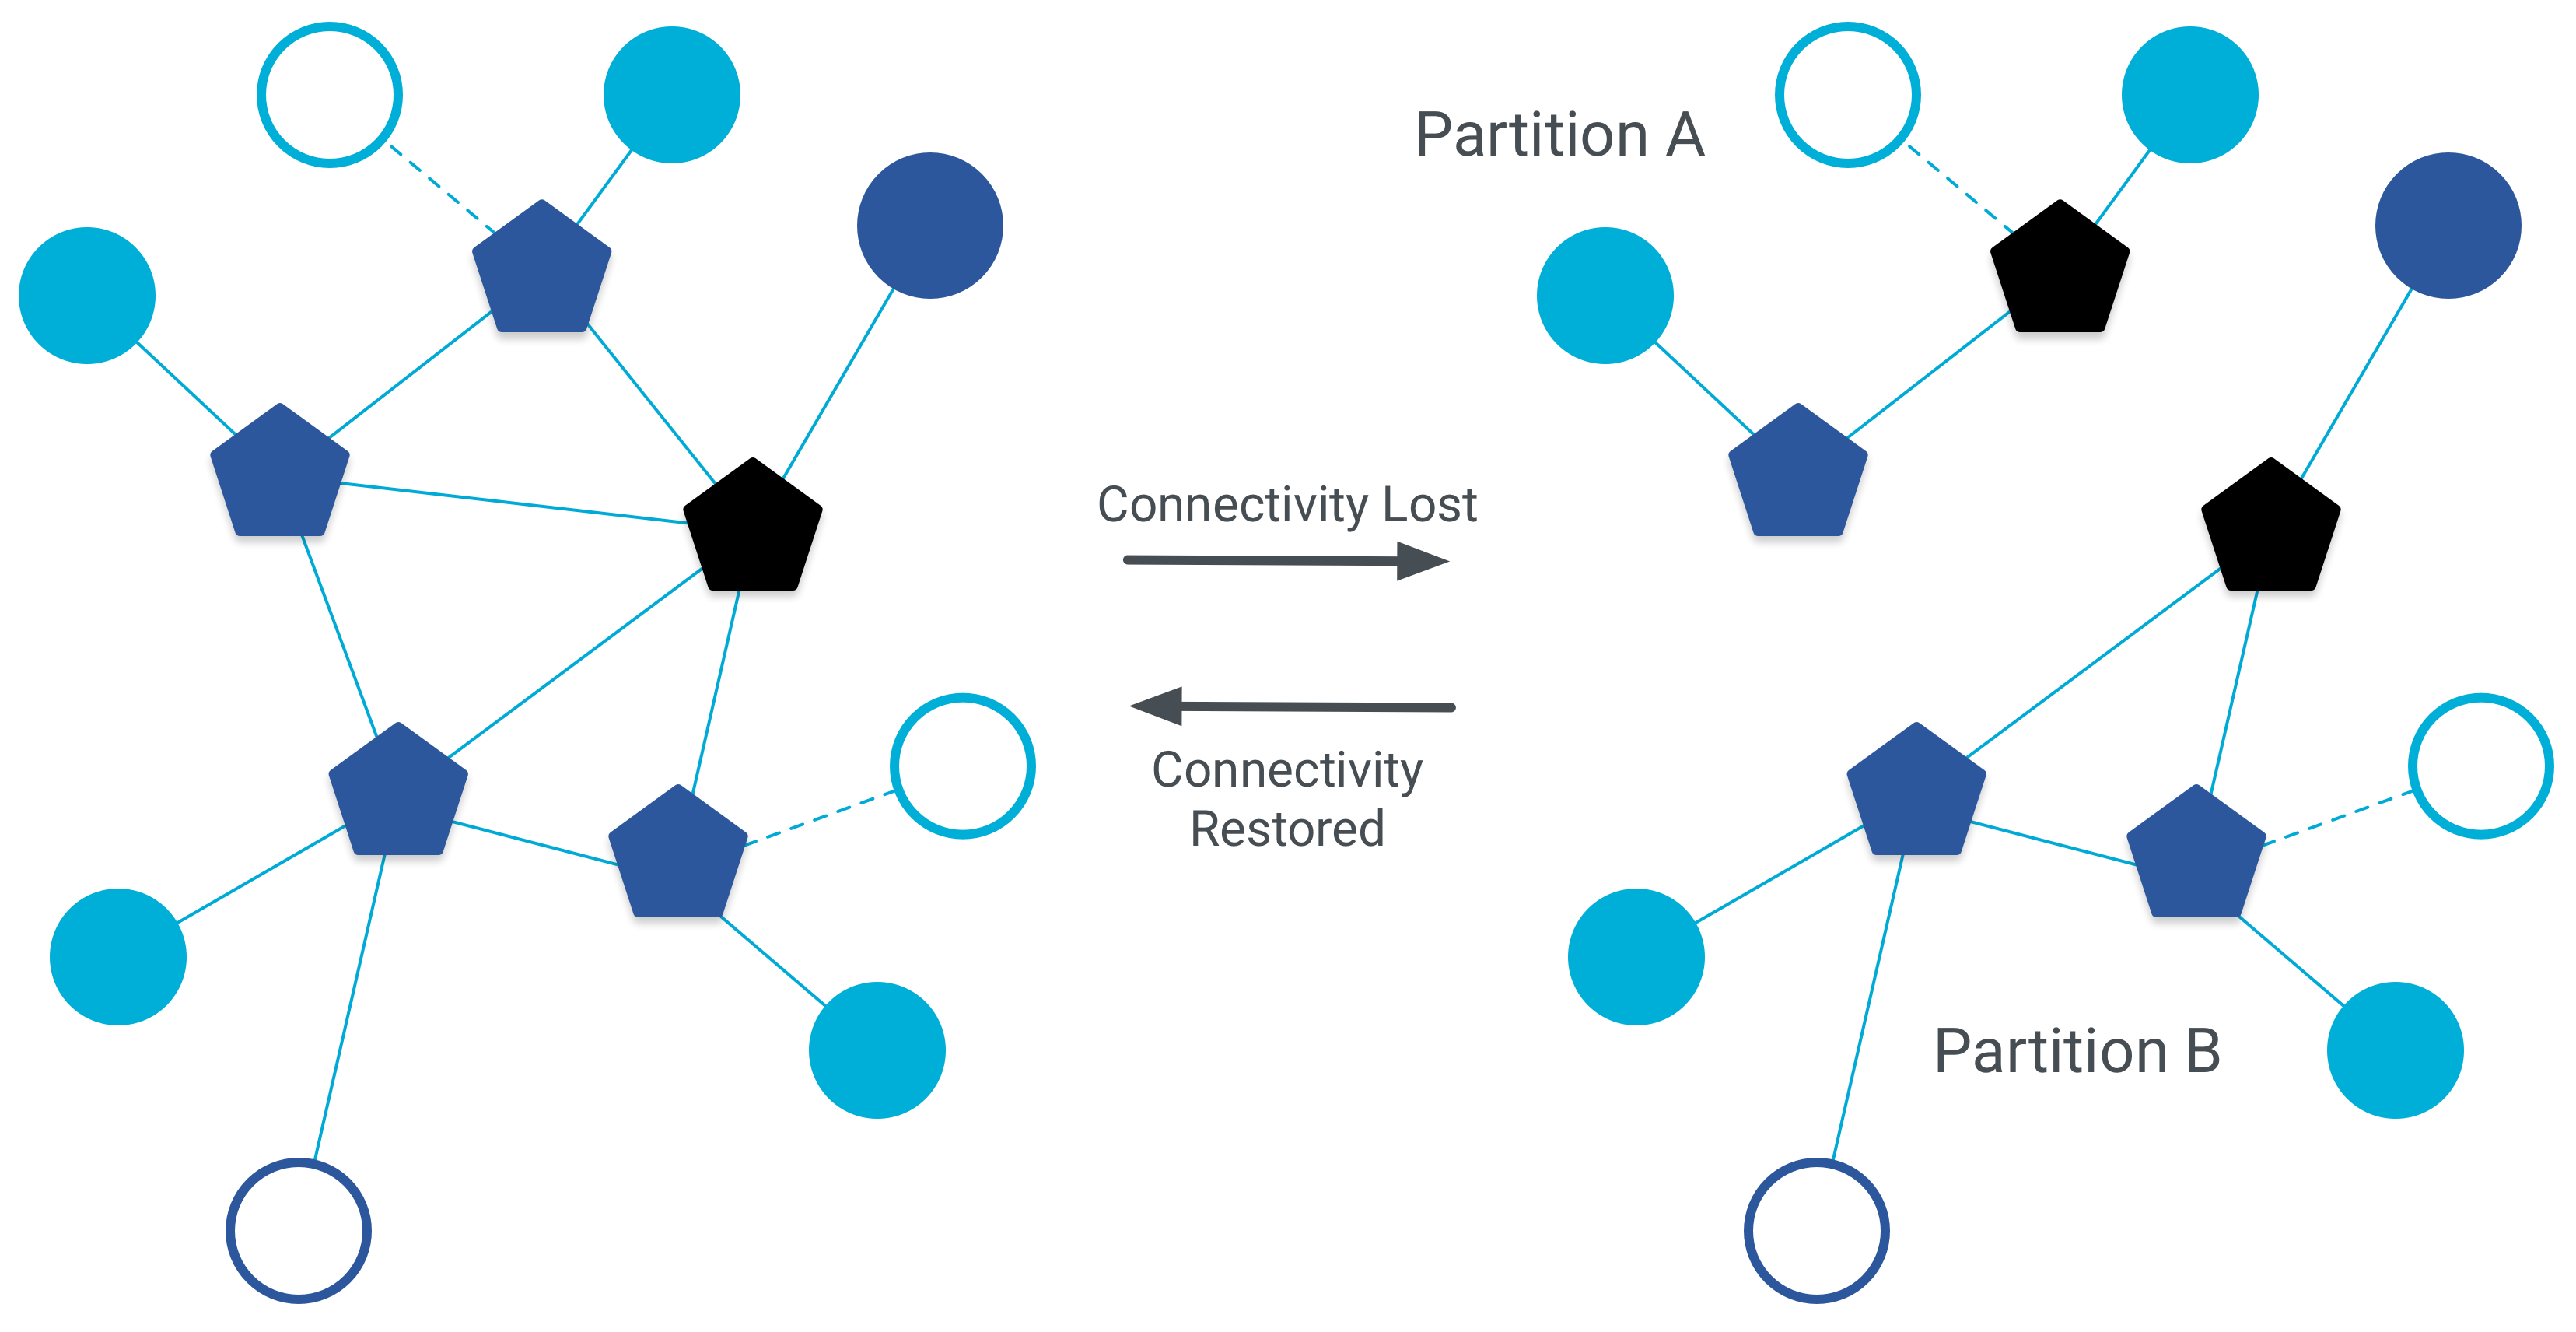
Routers can exchange routing information either:
-
Directly over the radio link (via the RCP), or
-
Indirectly over the IP backbone, if available
This IP-based router interconnect is called TREL (Thread Radio Encapsulation Link).
Without TREL, the network is far more likely to fragment into partitions, significantly reducing overall resilience.
Multiple Border Routers
All Thread routers can also be configured as secondary Border Routers. Multiple Border Routers are not only allowed but strongly recommended to eliminate single points of failure and improve recovery times during topology changes.
For a deep dive into all architectural and protocol details, refer to the official documentation at:
Hardware & Software
For my existing setup—using a Raspberry Pi 5 as the primary OpenHAB host—only two additional Thread Radio Co-Processors (RCPs) were required, plus a second Raspberry Pi 5 acting as a secondary OpenThread Border Router (OTBR) to improve redundancy and radio coverage.

Primary Host (Main OpenHAB System)
Raspberry Pi 5
2 GB RAM · 256 GB NVMe · headless · Ethernet-connected
Main Host
├─ openHAB 5.2.0M1 (bare metal)
├─ otbr-agent (bare metal)
├─ chip-tool 1.5 / matter-tool (bare metal)
├─ Podman
│ ├─ mosquitto
│ ├─ influxdb 2.7
│ ├─ grafana 12.3.3
│ └─ diagnostics
├─ Thread RCP (USB, Nordic nRF52840)
│ └─ RCP firmware: OPENTHREAD/thread-reference-20250612-398-g10c882d27
└─ Z-Wave RCP (USB, Aeotec Z-Stick)
The Thread RCP used is based on the Nordic nRF52840, for example the Makerdiary USB dongle
(https://wiki.makerdiary.com/nrf52840-mdk-usb-dongle/).
This host runs OpenHAB directly on the OS (“bare metal”), while containerised services such as MQTT and metrics are isolated via Podman.
Secondary Border Router (Redundancy & Coverage)
Raspberry Pi 5
2 GB RAM · 256 GB NVMe · headless
Secondary OTBR
├─ otbr-agent (bare metal)
├─ chip-tool / matter-tool (bare metal)
└─ Thread RCP (USB, Nordic nRF52840)
└─ RCP firmware: OPENTHREAD/thread-reference-20250612-398-g10c882d27
This secondary OTBR participates in the same Thread network, providing:
-
Additional radio coverage
-
Faster recovery from router or host failures
-
Reduced risk of Thread network partitions
Build Environment Requirements
In total, three software components must be built and installed. Since the Thread and Matter stacks are still evolving rapidly, regular updates are strongly recommended.
On the Raspberry Pi 5, a NVMe SSD and a 25 W power supply are highly advisable to compile and install the required software stacks reliably and without excessive build times or build failures.
For convenience you want use SSH Key-based authentication on the RPI’s and a multi client terminal app like Ptyxis on your Linux host system.
Alternative Hardware
Other OTBR-capable hardware exists, such as single-board or dual-SoC solutions (for example Espressif’s OpenThread Border Router implementation):
https://github.com/espressif/esp-idf/blob/master/examples/openthread/ot_br/README.md
These alternatives are not covered here, as this guide focuses on a Linux-based, modular setup.
Software Components and Their Roles
nRF52840 RCP Firmware
The RCP firmware runs on the nRF52840 and handles all IEEE 802.15.4 radio operations. It exposes a standardized control interface to the host but contains no Matter logic.
otbr-agent
The otbr-agent is the core Thread Border Router software. It is completely agnostic of Matter and operates purely at the Thread and IP layers.
-
Communicates with the RCP via Spinel, the standardized RCP protocol
-
Manages routing, leader participation, and backbone connectivity
-
Provides the
ot-ctlCLI, which is essential for:-
Thread network creation
-
Diagnostics
-
Partition and routing analysis
-
chip-tool / matter-tool
The chip-tool is the primary Matter debugging tool. It is used for:
-
Commissioning Matter devices
Debugging and low-level interaction
In this setup, all Matter devices are first commissioned using chip-tool on one of the OTBR’s . For BLE connection the device to join must be in close proximity to the OTBR.
OpenHAB then joins the same devices as a secondary Matter fabric, allowing normal interaction via the OpenHAB Matter add-on. However, it is also possible to commission devices with OH first, which might be more convenient for the beginner.
Why this matters
-
Clean separation of concerns: Thread ≠ Matter
-
OTBR handles routing and resilience; Matter handles device semantics
-
Multiple OTBRs increase robustness without increasing logical complexity
-
OpenHAB integrates cleanly as a secondary Matter controller
IPv6
All Matter-over-Thread communication is based on IPv6. IPv6 must therefore be fully enabled in your home network and on all Raspberry Pi hosts participating in the Thread infrastructure.
In particular, the Raspberry Pi must accept IPv6 Router Advertisements (RA) on the interface connected to your LAN (Ethernet or Wi-Fi).
Log in to your Raspberry Pi via SSH and check the current RA configuration:
grep . /proc/sys/net/ipv6/conf/*/accept_ra
For a typical Wi-Fi setup, the expected output should include:
/proc/sys/net/ipv6/conf/wlan0/accept_ra:2
A value of 2 means:
-
Accept router advertisements even when the interface is not a default router
-
This is required for Thread Border Routers and Matter tooling on Linux
Runtime Fix (Immediate)
If the value is 0 or 1, apply the runtime fix:
sudo sysctl -w net.ipv6.conf.wlan0.accept_ra=2
(Replace wlan0 with eth0or end0 if you are using Ethernet.)
Persistent Fix
To make this change permanent across reboots, a persistent sysctl configuration is required.
The exact method depends on your distribution and network setup—this is a good point to involve your code assistant to avoid breaking network startup ordering.
mDNS / Service Discovery
Matter relies heavily on mDNS for service discovery. On Linux, this is provided by Avahi.
Install the required tools:
sudo apt update
sudo apt install avahi-utils -y
You can verify mDNS functionality later using:
avahi-browse -a
Nordic nRF52840 Dongle Firmware
The nRF52840 must be flashed with OpenThread RCP firmware so it can act as a pure radio co-processor.
The Makerdiary USB dongle includes a UF2 bootloader, allowing firmware updates by simply copying a .uf2 file onto the device.
Bootloader documentation:
https://wiki.makerdiary.com/nrf52840-mdk-usb-dongle/programming/uf2boot/
Prebuilt Firmware (Recommended)
A precompiled OpenThread RCP binary is available here:
https://github.com/ArthFink/nrf52840-OpenThread
Download the file:
ot-rcp-USB.hex
To flash it via the Makerdiary UF2 bootloader, the HEX file must be converted to UF2 format.
UF2 Conversion
Install the UF2 utilities on your desktop host (Linux recommended):
pip install uf2-utils
Convert the firmware:
uf2conv.py ot-rcp-USB.hex -c -f 0xADA52840 -o ot-rcp.uf2
Then:
-
Plug in the dongle
-
Put it into bootloader mode
-
Copy
ot-rcp.uf2onto the mounted USB drive
After reboot, the device will enumerate as a Thread RCP.
Building from Source (Optional, Advanced)
If you prefer to compile the firmware yourself, be aware that this often results in “Configuration Hell” on the first attempt—especially on ARM hosts.
Strong recommendation:
Cross-compile on a desktop Linux system first.
Official documentation:
Why this matters
-
IPv6 misconfiguration is the #1 silent failure mode for Matter/Thread
-
accept_ra=2is mandatory but rarely documented -
mDNS must work before commissioning
-
A correctly flashed RCP avoids subtle OTBR instability later
otbr-agent
The otbr-agent is run bare metal on the Raspberry Pi 5, not inside a container. This is intentional and recommended: otbr-agent requires low-level access to the Thread RCP, direct control over network interfaces, and reliable mDNS (Avahi) integration. Containerising it adds unnecessary complexity and is a frequent source of subtle failures.
As a result, otbr-agent must be compiled and installed directly on the RPi5.
Official build instructions:
https://openthread.io/guides/border-router/build-native
Build Notes and Common Pitfalls
-
By default, the IP backbone interface is
wlan0, but this can be changed toeth0orend0if the Raspberry Pi is Ethernet-connected. -
Ensure that otbr-agent is bound to the correct serial device for the Thread RCP (e.g.
/dev/ttyACM0). This is especially important if multiple USB dongles are connected (Z-Wave, Zigbee, Thread). Ask your coding agent how to implement symbolic device links e.g. /dev/ttyTHREAD and /dev/ttyZWAVE. -
If the build fails on the first attempt (which is common), do not guess—use your code assistant to resolve missing dependencies or compiler errors cleanly.
Verifying a Successful Installation
Once otbr-agent is installed and configured correctly, the systemd service should start and remain active.
Check the service status:
sudo service otbr-agent status
A healthy installation will look similar to this:
● otbr-agent.service - LSB: thread border agent Loaded: loaded (/etc/init.d/otbr-agent; generated) Drop-In: /etc/systemd/system/otbr-agent.service.d └─override.conf Active: activating (start) Cntrl PID: 27063 (otbr-agent)
Most importantly, verify the command line parameters used to start the agent:
/usr/local/sbin/otbr-agent \ --vendor-name RAXOTBR \ --model-name RPi5-OTBR \ -I wpan0 \ -B wlan0 \ -v "spinel+hdlc+uart:///dev/ttyACM0?uart-baudrate=115200" \ trel://wlan0
Key elements to verify:
-
-I wpan0
→ Thread virtual network interface created by otbr-agent -
-B wlan0
→ Backbone interface (useeth0if applicable) -
spinel+hdlc+uart:///dev/ttyACM0
→ Correct RCP serial device and baud rate -
trel://wlan0
→ TREL enabled, allowing router-to-router communication over the IP backbone
If these parameters are correct and the service remains running, the Border Router is operational.
Why this matters
-
otbr-agent is the foundation of Thread routing and resilience
-
Bare-metal operation avoids timing, privilege, and mDNS issues
-
Correct interface and serial binding prevent silent misrouting
-
TREL must be enabled here to avoid network partitions later
Configuring the Thread Network
This is the essential step: all Thread routers and Border Routers must participate in the same Thread network. If you configure different credentials, you will end up with separate Thread networks (no redundancy, no shared routing domain, no automatic failover).
Rule 1: Keep one canonical Thread Operational Dataset
Thread network identity is defined by the Active Operational Dataset (channel, PAN IDs, network key, PSKc, etc.). In practice:
-
Create the dataset once on a “primary” OTBR
-
Export it
-
Import the exact same dataset on every additional OTBR/router
That is the difference between one resilient mesh vs multiple isolated meshes.
Enter the OTBR CLI
Use the interactive CLI:
sudo ot-ctl
Inspect the current dataset:
dataset active
You will see fields similar to:
-
Channel (often 15–20; choose based on 2.4 GHz coexistence)
-
Network Name (human-readable)
-
PAN ID (16-bit, e.g.
0x3a8c) -
Ext PAN ID (64-bit / 8 bytes)
-
Network Key (128-bit / 16 bytes)
-
PSKc (derived key used for commissioning; do not disclose)
Create a New Dataset (Primary OTBR)
On the primary OTBR:
dataset init new
Generate strong random values where needed:
openssl rand -hex 8 # Ext PAN ID (8 bytes)
openssl rand -hex 16 # Network Key (16 bytes)
Set/adjust dataset parameters as desired (example pattern; use the CLI command reference for exact syntax):
-
Channel
-
Network Name
-
PAN ID
-
Ext PAN ID
-
Network Key
CLI command reference:
https://openthread.io/reference/cli/commands#dataset_active
Commit the dataset as Active:
dataset commit active
Export the Active Dataset (Critical)
Export the complete Active Operational Dataset as a single hex blob:
dataset active -x
This exported value is what you use to replicate the exact same Thread network to other OTBRs.
Security note: the exported dataset is sensitive (it includes network material). Treat it like a Wi-Fi password (or worse).
Import the Dataset on Additional OTBRs (Secondary/Redundancy)
On the secondary OTBR(s):
- Enter the CLI:
sudo ot-ctl
- Paste/import the dataset hex blob (command name depends on CLI variant; commonly):
dataset set active <HEX_BLOB_FROM_PRIMARY> dataset commit active
Then verify:
dataset active
The output should match the primary OTBR for all identity/security-relevant fields.
If your CLI uses a slightly different import command, follow the OpenThread CLI reference for
datasetoperations. The key requirement is: every OTBR must end up with the identical Active Dataset.
Bring Up the Thread Interface and Start Thread
Still in ot-ctl:
ifconfig up
thread start
Wait a minute and check the role:
state
Expected states are typically:
-
leader(one device becomes Leader) -
router(most infrastructure nodes) -
sometimes
childfor non-router devices
If you see:
detached(persistent) or disabled
→ something is wrong (dataset mismatch, radio issues, backbone/TREL issues, or RCP binding issues)
For deeper diagnostics:
debug
and see the otbr-agent journal.
Verify Border Routing and Backbone Status
Check Border Router state:
br state
This should be running.
If you are using Backbone Border Routing (BBR), check:
bbr state
This should show Primary on one OTBR and Secondary on the other (or similar, depending on topology and configuration). The point is: BBR should be active and coordinated, not “off” everywhere.
Credential Hygiene (Non-Negotiable)
-
Never paste PSKc, Network Key, or the exported dataset hex blob into a code assistant or forum post.
-
Store sensitive values offline (password manager or encrypted notes).
-
If credentials are exposed, assume compromise and rebuild the Thread network with a new dataset.
If you want to track devices, keep a local record (spreadsheet/password manager) with:
-
OTBR hostname + RCP serial device path
-
Thread channel + network name (non-secret)
-
Matter node IDs / device labels
-
Commissioning dates / locations
What you actually need for Matter commissioning
Most Matter device onboarding uses the Matter setup code / QR code and your Matter controller (chip-tool, phone controller, etc.) handles the Thread credentials distribution. The exported Thread dataset is primarily for:
-
Cloning the network across OTBRs
-
Disaster recovery / migration
-
Deep debugging
TREL (Thread Radio Encapsulation Link)
TREL is essential.
It enables router-to-router communication over the IP backbone, allowing Thread routers and Border Routers to exchange routing information even when they are not within direct radio range.
Without TREL, a multi-OTBR deployment can silently degrade into isolated Thread partitions (“network islands”), destroying redundancy and self-healing behaviour.
TREL operates by encapsulating Thread routing traffic over IPv6/UDP and advertising its presence via mDNS.
Verifying TREL via mDNS
Each OTBR announces its TREL endpoint using the _trel._udp service. To verify this, run:
avahi-browse -rt _trel._udp
You should see one entry per OTBR, similar to:
= wlan0 IPv6 otTRELcae5c11aa69a7528 _trel._udp local hostname = [otcae5c11aa69a7528.local] address = [192.168.1.79] port = [38541]
What matters:
-
Every OTBR appears exactly once
-
The service is bound to the correct backbone interface (e.g.
wlan0oreth0) -
Each OTBR advertises a unique hostname and port
If an OTBR does not appear here, TREL is not operational for that node.
Verifying TREL Activity in otbr-agent
Next, confirm that otbr-agent is actively using TREL:
journalctl -u otbr-agent | grep -i trel
You should see log entries indicating:
-
TREL initialization
-
TREL peer discovery
-
Ongoing TREL communication
To observe live activity:
sudo journalctl -u otbr-agent -f -n 0
During normal operation you should see periodic messages as OTBRs exchange routing and state information over the backbone.
Typical Failure Modes
If TREL is not working, common causes include:
-
mDNS (Avahi) not running or blocked
-
IPv6 not properly enabled on the backbone interface
-
otbr-agent started without
trel://<interface> -
Firewall rules blocking UDP traffic
-
OTBRs connected to different Layer-2 networks or VLANs
Any of these will prevent routers from discovering each other over the backbone.
Why TREL matters so much
-
Enables multi-OTBR resilience
-
Prevents network partitioning when radio links are weak or temporarily unavailable
-
Allows Thread routing to survive physical relocation of routers
-
Makes Border Routers cooperate instead of competing
In practice:
No TREL → no real redundancy, regardless of how many OTBRs you deploy.
TX Power & Thread Channels
TX Power Configuration
Make sure to set the Thread radio transmit power to +8 dBm, which is the practical maximum supported by most nRF52840-based RCP firmwares:
sudo ot-ctl txpower 8
This significantly improves link margin during network formation and stabilises router-to-router connectivity.
Values above +8 dBm are not supported by the firmware and/or regulatory domain and will be rejected silently or clamped.
Persisting TX Power Across Reboots
The TX power setting is not persistent across reboots. To apply it automatically after otbr-agent starts, create a dedicated systemd unit.
Create the service file:
sudo nano /etc/systemd/system/otbr-txpower.service
Insert exactly the following content:
[Unit] Description=Set OpenThread TX Power After=otbr-agent.service Requires=otbr-agent.service [Service] Type=oneshot ExecStart=/usr/bin/ot-ctl txpower 8 [Install] WantedBy=multi-user.target
Enable and start the service:
sudo systemctl daemon-reload sudo systemctl enable otbr-txpower.service sudo systemctl start otbr-txpower.service
Verify after reboot:
sudo ot-ctl txpower
Thread Channel Selection and Wi-Fi Coexistence
Thread operates in the 2.4 GHz band and therefore shares spectrum with Wi-Fi. Poor channel selection is a common cause of packet loss, delayed joins, and unstable routing.
If you suspect interference from Wi-Fi, select a Thread channel that falls between active Wi-Fi channels, not directly underneath them.
Recommended Channel Planning (EU)
| Wi-Fi Channel (EU) | Overlapping Thread Channels | Recommended Thread Channel |
|---|---|---|
| 1 | 11–14 | 15 (gap between Wi-Fi 1 & 6) |
| 6 | 16–19 | 20 (gap between Wi-Fi 6 & 11) |
| 11 | 21–24 | 25 (above Wi-Fi 11) |
| 13 | 25–26 |
General guidance:
-
Channels 15, 20, and 25 are usually good starting points
-
Avoid changing channels after devices are commissioned
-
Channel changes require recommissioning all Thread devices
Practical Recommendations
-
First stabilise TX power and TREL
-
Then evaluate channel interference only if you see:
-
frequent detach/attach events
-
unstable router promotion
-
slow or failing joins
-
-
Use Wi-Fi scanning tools (
iw, router UI) to confirm actual channel occupancy
Why this matters
-
Thread assumes short hops + strong links
-
Low TX power or bad channel choice destroys mesh density
-
Symptoms often look like “Matter bugs” but are purely RF issues
-
Fixing this early prevents weeks of false debugging later
CHIP Tool (chip-tool)
For all Matter-related commissioning, diagnostics, and low-level interaction we use chip-tool, the reference Matter controller CLI.
What chip-tool Is
-
chip-tool= Matter reference controller (CLI) -
Part of the Project CHIP / Matter SDK
-
Used for:
-
Device commissioning
-
Multi-admin (multi-fabric) pairing
-
Diagnostics and debugging
-
Reading Matter clusters (network, Thread, power, etc.)
-
Best practice: run chip-tool bare metal on the same host as:
-
the IPv6 stack
-
the OTBR
-
the Thread network
-
the Matter fabric state
This avoids subtle IPv6, mDNS, and credential-propagation issues.
Building chip-tool on the Raspberry Pi 5
chip-tool is not distributed as a prebuilt package and must be built locally.
At the time of writing, v1.5 is current.
Run the following line by line:
git clone https://github.com/project-chip/connectedhomeip.git
cd connectedhomeip
./scripts/bootstrap.sh source scripts/activate.sh ./scripts/examples/gn_build_example.sh examples/chip-tool out/chip-tool
sudo install -m 0755 out/chip-tool/chip-tool /usr/local/bin/chip-tool
Verify:
chip-tool help
There is no complete official command reference; most commands are discovered via
chip-tool helpand log output.
Commissioning Matter Devices
The key design principle in Matter is:
All fabrics are equal.
There is no:
-
master fabric
-
admin fabric
-
root controller
-
superuser fabric
Every fabric is an independent trust domain and each device can be commissioned to up to 256 fabrics.
For commissioning a close proximity between the new device and the controller is needed for the BLE wireless connection. After joining the first fabric you can open a commissioning window with a new Manual Pairing Code to connect the device to another fabric controller, if it is connected by the IP backbone.
I prefer to commission a device first with the chip-tool, because it gives a detailed log file, if anything goes wrong. Than opening a commissioning window and join with OH as a second fabric. If chip-tool is executed on each OTBR, these represent two different fabrics.
Commissioning Devices with chip-tool
Preparation (Strongly Recommended)
Before commissioning, keep a local spreadsheet or encrypted notes with:
-
Vendor / model
-
Vendor ID
-
Product ID
-
Setup PIN
-
Discriminator
-
Assigned Matter Node ID
-
Physical location
-
Commissioning date
This is essential for later debugging.
Matter Setup Credentials
Each Matter device provides:
-
an 11-digit setup PIN (e.g.
1234-567-8912) -
a QR code
Decoding the QR yields a Matter QR Code Payload (Base38), e.g.:
MT:EX7C0ANB008K8F7K010
This payload contains:
-
Vendor ID
-
Product ID
-
Commissioning flow
-
Discovery capabilities (BLE / IP)
-
Discriminator
-
Setup PIN
-
Version information
Node ID vs. Discriminator (Do Not Confuse These)
| Concept | Purpose | Who defines it |
|---|---|---|
| Node ID | Permanent device identifier inside a Matter fabric | You |
| Discriminator | Temporary discovery filter during commissioning | Manufacturer |
They are completely unrelated.
Initial Commissioning (BLE → Thread)
Initial commissioning is typically done over Bluetooth Low Energy (BLE).
Requirements:
-
Device close to the OTBR host
-
Bluetooth enabled on the Raspberry Pi
-
Active Thread network already running
Check Bluetooth:
systemctl status bluetooth
Commissioning Command
chip-tool pairing code-thread <NODE_ID> <HEX:OPERATIONAL_DATASET> \ --paa-trust-store-path /etc/otbr/credentials/paa-root-certs \ | tee <NODE_ID>.txt
Notes:
-
<NODE_ID>is the identifier you chose -
<HEX:OPERATIONAL_DATASET>ensures the device joins the correct Thread network -
--paa-trust-store-path <your path> or~/connectedhomeip/credentials/production/paa-root-certs -
Always log output using
tee— it contains critical metadata
Verifying Thread Attachment
sudo ot-ctl child table
![]() Sleepy End Devices (SEDs) may not appear continuously — this is expected.
Sleepy End Devices (SEDs) may not appear continuously — this is expected.
Pairing with openHAB as Second Fabric
If OpenHAB joins devices as a second Matter fabric it is assumed that OH already is connected as a Matter controller.
To do this, you must open a commissioning window on the already-commissioned device:
chip-tool pairing open-commissioning-window <NODE_ID> 1 300 1000 <DISCRIMINATOR>
What the Discriminator Is (and Is Not)
The discriminator is a 12-bit, non-secret discovery filter used only during commissioning.
-
It helps controllers discover the correct device
-
It does not affect security
-
It is not the Node ID
-
Valid range:
0–4095
The discriminator is embedded in:
-
the QR code
-
the manual setup code
-
the QR payload
-
the original
chip-toolcommissioning logs
How to Find the Discriminator (Practical Methods)
Decode with chip-tool itself
chip-tool includes a setup payload parser. This is the safest and most future-proof method.
Step 1: Extract the QR payload string
From the QR code, copy the string starting with MT:
Example:
MT:EX7C0ANB008K8F7K010
Step 2: Decode it with chip-tool
Run:
chip-tool payload parse-setup-payload MT:EX7C0ANB008K8F7K010
Example output (abridged)
[1770374144.485] [5901:5901] [SPL] Version: 0
[1770374144.485] [5901:5901] [SPL] VendorID: 4476
[1770374144.485] [5901:5901] [SPL] ProductID: 32773
[1770374144.485] [5901:5901] [SPL] Custom flow: 0 (STANDARD)
[1770374144.485] [5901:5901] [SPL] Discovery Bitmask: 0x02 (BLE)
[1770374144.485] [5901:5901] [SPL] Long discriminator: 2658 (0xa62)
[1770374144.485] [5901:5901] [SPL] Passcode: 65212700
![]() This
This Discriminator: 2658 is exactly the value you need for:
chip-tool pairing open-commissioning-window <NODE_ID> 1 300 1000 2658
This method is:
-
offline
-
deterministic
-
guaranteed to match the device
Completing Pairing in openHAB
-
Open the Matter binding in openHAB
-
Use the new “Manual pairing code” printed by the command.
chip-tool pairing open-commissioning-window <node id> 1 300 1000 <discriminator | grep “Manual pairing code” -
Wait for discovery (can take several minutes)
-
Configure channels for Things as usual
The OH UI will show your connected Matter devices and communication status. When commissioned successfuly you will find diagnostic information in the OH Thing Properties display. The GeneralDiagnostics-macAddress will be eventually displayed in the ot-ctl child and router tables. Save it in your device spreadsheet.
Here about a dozen IKEA and Aqara Sensors are paired with two OTBR’s.

Compared to WiFi connected Matter devices, which frequently drop off, Thread offers a reliable and dynamic self-reconfiguring mesh network.
Firmware Update
As of OpenHAB 5.2.0M2 or later firmware update of matter devices is available in the thing GUI
Why This Workflow Works
-
chip-toolallows detailed debugging of the joining process -
Thread credentials propagate correctly
-
openHAB joins cleanly as a secondary fabric
-
Debugging remains possible long after installation
Common Misconceptions & Traps — and Why They’re Actually a Good Sign
Matter and Thread are complex and feature-heavy by design. They are not hobby protocols; they are the result of many years of standardisation, interoperability testing, and large-scale deployment experience.
Commercial hubs and graphical user interfaces deliberately hide this complexity to provide a smooth out-of-the-box experience. That approach is perfectly valid—and often ideal—if you operate a small number of devices in a compact environment with a single hub and minimal redundancy requirements.
However, once you move beyond that scope—
dozens of devices,
larger or multi-floor premises,
multiple Border Routers,
mixed vendors,
and a desire for true resilience and fault tolerance—
the abstraction provided by consumer hubs becomes a limitation rather than a benefit.
At that point, a more professional approach is required.
Typical Misconceptions (and the Reality)
-
“Thread just works like Wi-Fi.”
→ Thread is an IPv6 mesh with leader election, partitions, backbone routing, and multiple transport paths. It works differently—and more robustly when configured correctly. -
“More hubs automatically mean more resilience.”
→ Only if all routers share the same Thread dataset and can communicate via TREL. Otherwise, you create isolated islands. -
“If a device doesn’t respond, it’s a Matter bug.”
→ In practice, most issues are RF density, channel choice, TX power, IPv6, or commissioning-flow problems—not Matter itself. -
“Sleepy devices are unreliable.”
→ Sleepy End Devices behave exactly as designed. The network must adapt to them, not the other way around.
The Positive Reframe
Once you understand the architecture, something important happens:
-
You stop guessing.
-
You stop rebooting things “just in case”.
-
You stop blaming vendors prematurely.
Instead, you gain:
-
Predictability — you know why something behaves the way it does
-
Control — you decide where redundancy is added
-
Resilience — failures become non-events, not outages
-
Vendor independence — devices become interchangeable components
Thread + Matter are not fragile systems.
They are deterministic systems that reward correct design.
Why This Guide Exists
This guide intentionally exposes the layers that commercial products try to hide:
-
Thread datasets and credentials
-
OTBR behaviour and TREL
-
IPv6 and mDNS realities
-
Commissioning flows and fabrics
-
RF planning and router density
Not because the GUI approach is wrong—but because at scale, transparency beats convenience.
If you made it this far, you are already operating beyond the “plug-and-play” tier.
That’s not a disadvantage—it’s exactly where Thread and Matter start to shine.
Final Thought
Matter and Thread don’t fail silently — they fail explainably.
Once you understand the system, problems become solvable, repeatable, and ultimately rare.
If you treat your Thread network like infrastructure instead of magic,
you will get exactly the reliability it was designed to deliver.