@Qwerty_Zet, Thanks, this is the scenario I had in mind when I asked if " the rest will take place by connecting OTA with the mini". In other words, the plugin is to be loaded from the interface of the D1 mini (through wireless) , rather than by means of an interface program running on my Windows PC.
Let me try to briefly describe the journey (assuming D1 mini):
- connect board to your computer using USB micro cable - this should create a virtual COM port, i.e. COM5,
- start flasher app (included in the zip), select
ESP_Easy_mega_20200913_test_ESP8266_4M1M_VCC.binas firmware image to upload and COM port where your board is connected to, - upload fw, when completed, restart the board (there is a hardware restart button on board if I’m not mistaken),
- since ESPEasy is not yet configured, your board will act as an access point (what Qwerty_Zet explained above) - SSID = ESP_Easy_0, pass = configesp - connect to it using your computer and it should automatically open web browser when connected,
- there you will see list of available access points - please select the one you want your board to connect to and set it up (enter security/password/…),
- enter static ip if you want your board to have it or leave as is if your board should use DHCP to gain IP,
- save config and restart your board again - now it should connect to the wifi you setup in previous step,
- start web browser on your computer and enter
http://<ip of your board>/and you should see ESPEasy web interface where you can setup everything you need (you should see something like in the screenshots in my first post).
More details can be found here.
1 Like
Thanks a lot. I find it crystal clear now. Sorry, that I took so long to get there!
No problem, it will be easier when you have the device so you can try for yourself - please let me know how it goes - or if you have any questions and/or comments. Good luck!
Hi there,
Thank you, I’ve installed everything as described and all works great.
The only note that I think can be added to the description - it only works with HardwareSerial.
For a couple of years I had a custom program to control the heatpump. It worked through SoftwareSerial on pins D5 and D6. Everything was OK but I decided to switch to your one because of the more detailed integration. Also I didn’t want a startup rubbish from ESP8266 be sent to the heat pump. Plus I could debug it easier. That is why I chose SoftwareSerial.
ESPEasy + this program don’t work if you choose SoftwareSerial for some reason. Only HardwareSerial works.
Thanks!
Hey!
Glad to hear you managed to get it working ![]()
I also had some doubts about startup rubbish via hw serial0 send by ESP8266, but then reading through community seems as other people are using that setup and woks for them so I tried the same and is working now for almost a year in 4 ACs … not sure ofc is that is any guarantee after all ![]()
That said, in my setup I only tested the HW serial0 with D9/D10 … so cannot really say anything about others - from the plugin perspective, this is handled transparently and should work over any kind of serial interface - as can be seen here, so probably this is more of a ESPEasy issue … Did you happen to try with D7/D8 (swapped hw serial 0)? Or maybe open an issue and we can try to tackle it there?
Enjoy!
Hi crnjan,
I have now received the D1 Mini and I have followed the procedure described in your Nov. 21 message to flash it with your recommended firmware. I can now access the D1 on my local network. I have defined a Task Setting that looks exactly like the one shown on your original posting. I have also defined a controller no. 1 of type openhab MQTT; my only input there was to specify the address of my MQTT broker. It looks as if this is all I need to do. Right?
Before proceeding to connect the D1 mini to my heatpump, I thought I would implement and test the mqtt borker and OH software bits.
I installed mosquitto on my OH machine, and then, using the MQTT OH binding, I set up a broker connection to mosquitto. Then, I copied your .things, .items and .sitemap code with just minor name changes.
I am happy to report that so far so good. Monitoring the relevant mosquitto topic on my OH machine (I am using the command “mosquittto_sub -t ‘ESP_Easy1’”) I can see the effect of triggering the heatpump buttons on my sitemap interface, e.g.
MitsubishiHP,power,ON
MitsubishiHP,temperature,16
MitsubishiHP,fan,3
MitsubishiHP,vane,3
MitsubishiHP,wideVane,>
MitsubishiHP,mode,HEAT
etc.
At this point, I would like, if possible, to verify whether or not the D1 mini is receiving these bits.
Does the D1 mini automatically subscribe to the relevant topic (in your case I suppose it would be “FF_Nik_Room/#” or “FF_Nik_Room/ac/#” and in my case “ESP_Easy1/#” or “ESP_Easy1/ThermopompeCdM/#”)?
Is there a way to monitor through the web interface what the D1 Mini is receiving (before I connect it to my heatpump)?
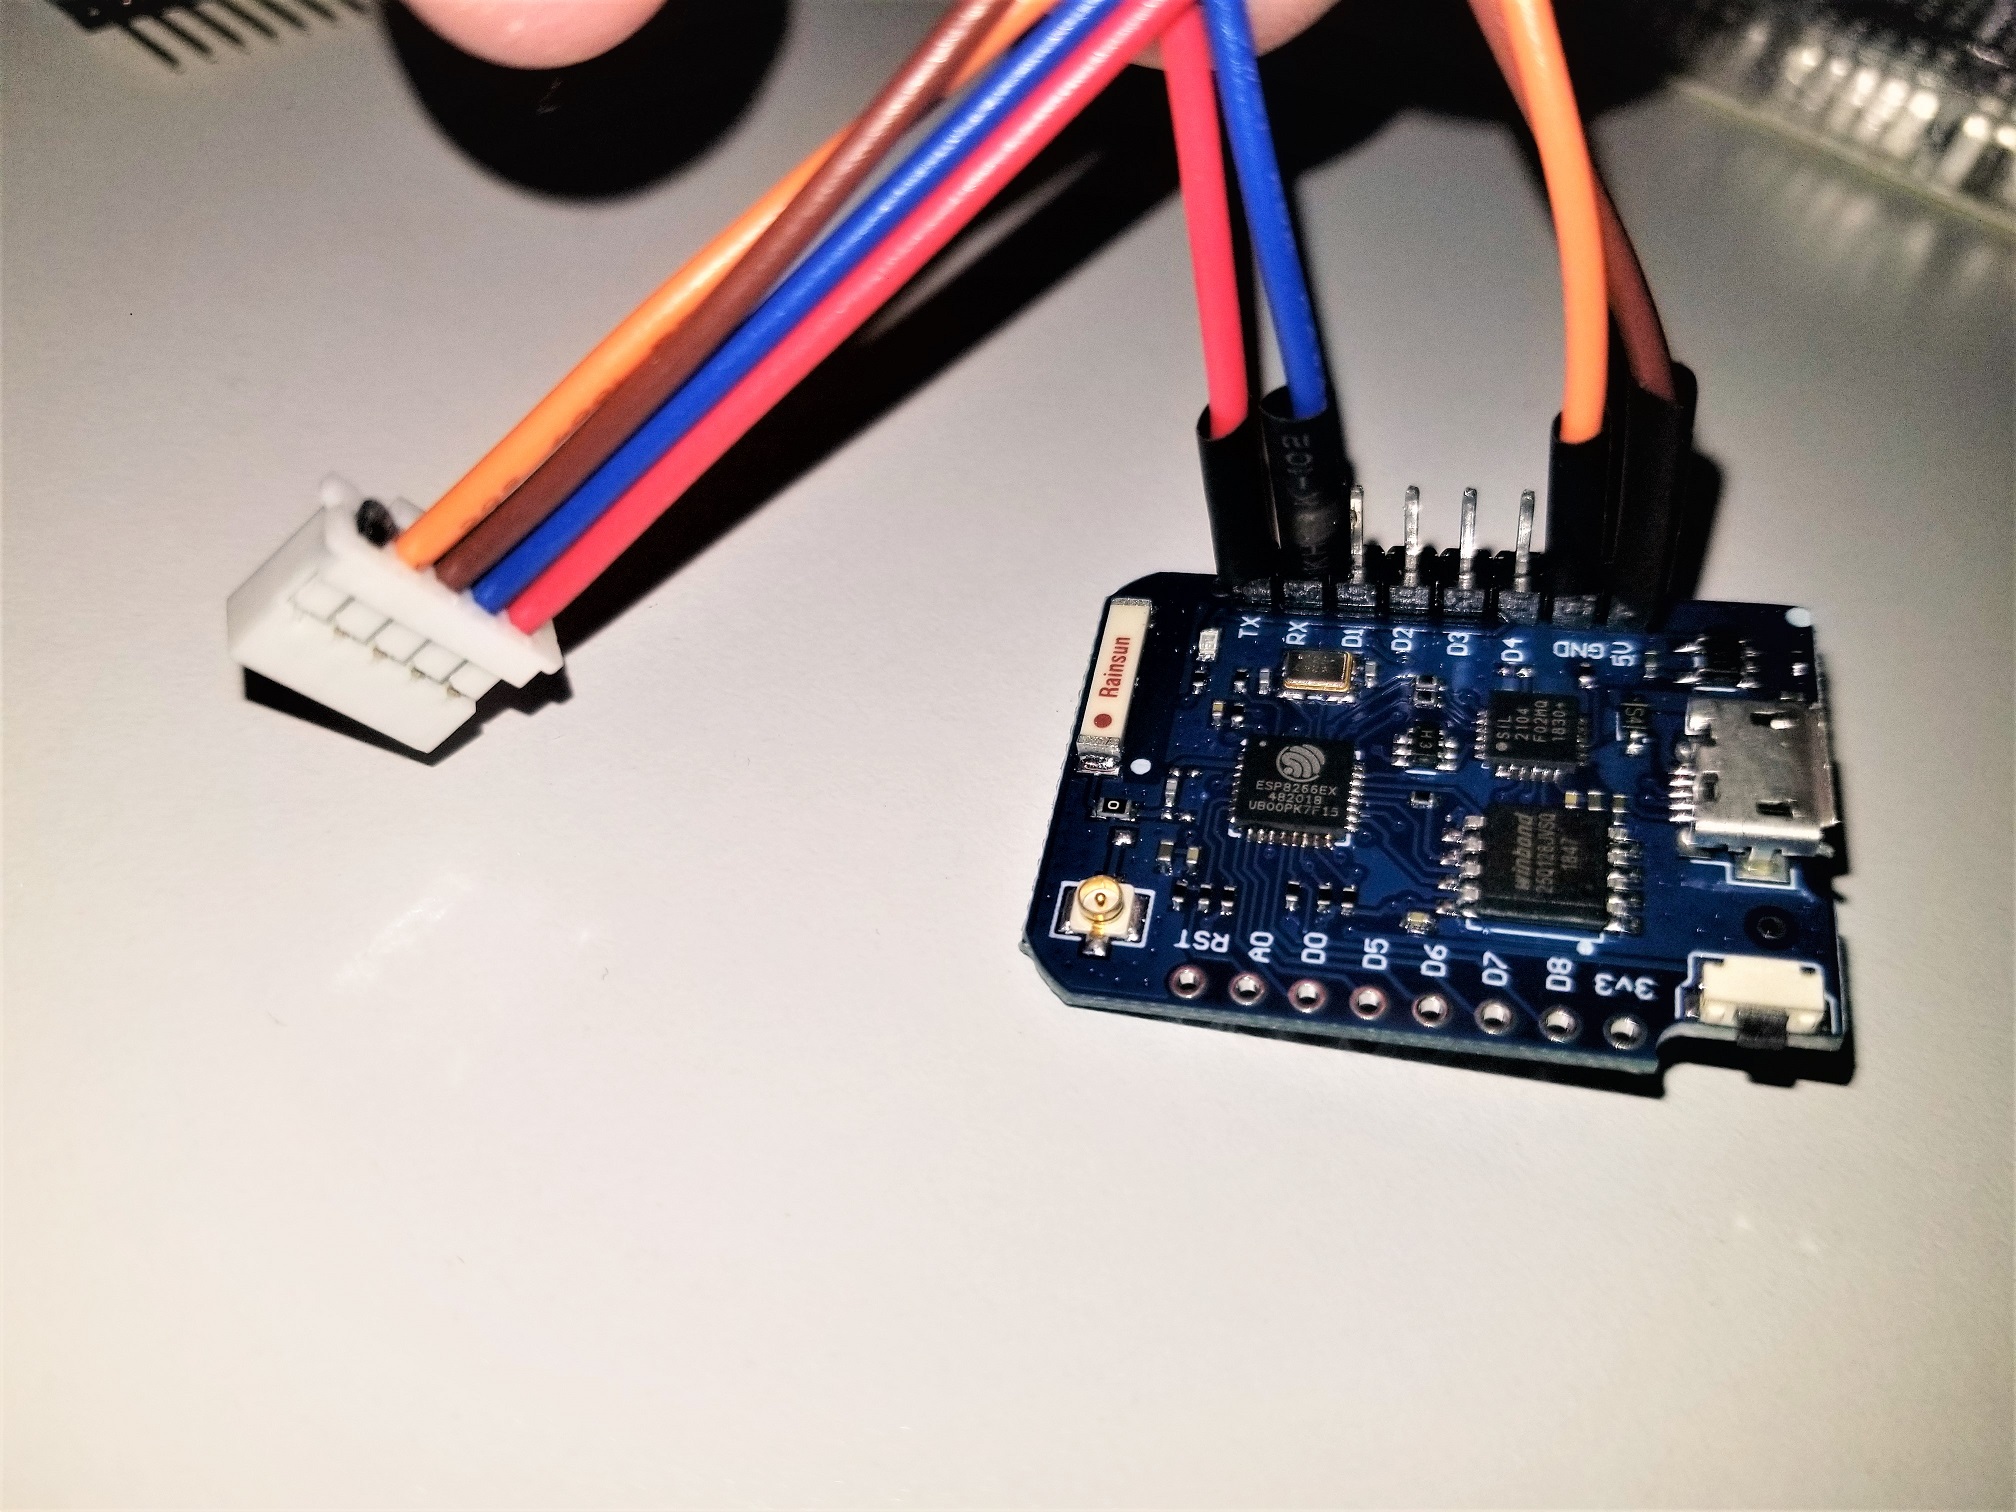
Finally, I have a question about the physical connection. I bought the pre-crimped cables and the PAP-05V-S that you recommended. I understand that I need to insert one end of the pre-crimped cables into the PAP-05V-S connector. Do I need any special tool for that purpose? Is there any particular orientation required in order for the crimped metal end to lock securely into the PAP-05V-S?
Many thanks for your patience and Happy New Year.
Oops, I just realized that I had missed the “log” button under the “Tools” tab. It does report the following error:
5314375: WD : Uptime 89 ConnectFailures 175 FreeMem 20136 WiFiStatus WL_CONNECTED
5321469: MQTT : Intentional reconnect
5321612: MQTT : Broker C005 connection failed (176/0)
5344376: WD : Uptime 89 ConnectFailures 176 FreeMem 20096 WiFiStatus WL_CONNECTED
5351747: MQTT : Intentional reconnect
5351892: MQTT : Broker C005 connection failed (177/0)
Thus it seems that for some reason, the connection to my mosquitto broker fails. I am puzzled by that because the broken is on my local network and is not password protected at this time.
There is no special tool required for connectors and cables, just turn the cable so it will “click” into the little hole in the connector:

When in place, you can try to (softly) pull the cable back from the connector - and you should not be able to do so.
For MQTT setup - I only entered the IP address of my broker - are you using hostname or IP?
I see something like this in my log:
1765022072: WD : Uptime 29417 ConnectFailures 0 FreeMem 18328 WiFiStatus 3
Correction. I had omitted to modify the taskname (from your “MitsubishiHP” to my “Thermopompe-CdM”) in my things file. Te MQTT messages now look as follows:
Thermopompe-CdM,power,ON
Thermopompe-CdM,fan,4
Thermopompe-CdM,wideVane,|
Thermopompe-CdM,mode,HEAT
Thermopompe-CdM,temperature,16
Thermopompe-CdM,vane,4
Thermopompe-CdM,power,OFF
Unfortunately that correction had no impact on my connection issue, which is reported as follows:
154273: WD : Uptime 3 ConnectFailures 6 FreeMem 20488 WiFiStatus WL_CONNECTED
175511: MQTT : Intentional reconnect
175655: MQTT : Broker C005 connection failed (7/0)
184273: WD : Uptime 3 ConnectFailures 7 FreeMem 20488 WiFiStatus WL_CONNECTED
205793: MQTT : Intentional reconnect
205936: MQTT : Broker C005 connection failed (8/0)
214273: WD : Uptime 4 ConnectFailures 8 FreeMem 20440 WiFiStatus WL_CONNECTED
236070: MQTT : Intentional reconnect
236214: MQTT : Broker C005 connection failed (9/0)
244273: WD : Uptime 4 ConnectFailures 9 FreeMem 20368 WiFiStatus WL_CONNECTED
266351: MQTT : Intentional reconnect
266495: MQTT : Broker C005 connection failed (10/0)
274273: WD : Uptime 5 ConnectFailures 10 FreeMem 20352 WiFiStatus WL_CONNECTEDIMHO OH setup has nothing to do with the fact that ESPEasy is unable to connect to broker - so you can leave your OH setup as-is until ESPEasy is able to connect to broker. Are you sure you entered the correct IP address for Controller IP: in your ESPEasy? And are you using IP or hostname?
Thanks for your comments. In my ESP module, I am using the local IP address of my mosquitto broker: 192.168.2.3, port 1883.
Now, I just made an interesting finding. I downloaded a chrome extension called MQTTlens which is meant to help one test MQTT connections. I am using a chrome instance running on th same machine as my mosquitto broker. When I ask MQTTlens to establish a connection at 127.0.0.1 it does succeed in creating it. Same thing if I use “localhost” instead of 127.0.0.1. Now, the surprising (to me at least) bit is that if I use 192.168.2.3, which happens to be the same local host, it does not work.
As I expected, if I run MQTTlens on a different machine, I am not able to connect to mosquitto at all (it is no longer reachable at 127.0.0.1)
In my mosquitto.conf file, I have the following line:
#allow_anonymous false
Since “allow_anonymous” is TRUE, I am assuming that connections can be established from any machine on the local network. Could I be wrong on that?
Also, when I use the following Windows command on the machine that runs mosquitto:
C:\Program Files\mosquitto>mosquitto_sub -h 192.168.2.3 -t "ESP_Easy1/#"
I get an error message saying that the target computer refused the connection. It only works when I use “localhost” or “127.0.0.1”. I tried turning my firewalls, bi=ut it did not help.
MQTT Lense is quite old, I had issues with connecting to my raspberry PI mqtt server. I recommend using mqtt explorer instead. It has much better UI and logs.
And yes, sounds like you have issues with your broker. Are there any other devices that are able to connect to the broker?
Thanks for your suggestion: I will try mqtt explorer as well. However, the fact that mosquitto_sub is equally unable to connect on the local host to connect using its LAN IP (192.168.2.3) does suggest that the problem is on the broker side.
OK, mosquitto connection is now workin! My mistake was that I had misunderstood the default configuration of the broker, which only allows “loopback” connections.
My D1 mini is not wired into my heatpump yet, but it does seem to be receiving mqtt messages whenever I change the settings of the heatpump interface in the OH UI.
Here is a sequence of messages getting published on the top-level topic “ESP_Easy1” (the “sysname” of my D1 mini):
Thermopompe-CdM,power,ON
NEXTION075 : WRITE = power,ON
Thermopompe-CdM,power,OFF
NEXTION075 : WRITE = power,OFF
Thermopompe-CdM,mode,COOL
NEXTION075 : WRITE = mode,COOL
Thermopompe-CdM,power,ON
NEXTION075 : WRITE = power,ON
Thermopompe-CdM,fan,4
NEXTION075 : WRITE = fan,4
Thermopompe-CdM,wideVane,|
NEXTION075 : WRITE = wideVane,|
Thermopompe-CdM,vane,4
NEXTION075 : WRITE = vane,4
The “Thermopompe-CdM,X,Y” messages are those published as a result of my OH interface actions, and the “NEXTION075 : WRITE = X,Y” are those published by the D1 mini upon receiving the corresponding OH request.
I am tempted to conclude that everything is now working on the software side, and that I can therefore proceed with wiring the D1 mini into my heatpump.
@crnjan: do you agree or is there more than I need to do before that?
Great to hear! I would suggest to start up a MQTT client (I used MQTT.fx) and subscribe to AC topic (or to # to make sure you get all messages) and connect D1 to AC unit - and wait for something like
{"roomTemperature":23.0,"wideVane":"|","power":"OFF","mode":"AUTO","fan":"QUIET","vane":"AUTO","iSee":false,"temperature":24.0}
![]()
Thanks for the suggestion.
I haven’t found any clear pictures showing correct pin-out with colored cables. From what I understood, if I number the pins from 1 to 5 on CN105 connector (looking from the backside where cables will be inserted and with the locking mechanism on top), I will have, as marked on the D1:
1- not used for this application
2- ground
3- 5V
4- RX
5- TX
Right?
I shoud have said that my numbering goes from left to right.