Mitsubishi Heat Pump

Finally found the time to integrate my Mitsubishi Heatpump. It turned out there are many a bit different tutorials available on how to achieve this - all using the great library from https://github.com/SwiCago/HeatPump, but with a bit different sketches - so no out-of-the-box solution (firmware).

I’m using ESPEasy for other sensors I have at home and really like how easy it is to set it up, do OTA, … therefore decided to give it a spin and integrate the above mentioned library into ESPEasy as a plugin.

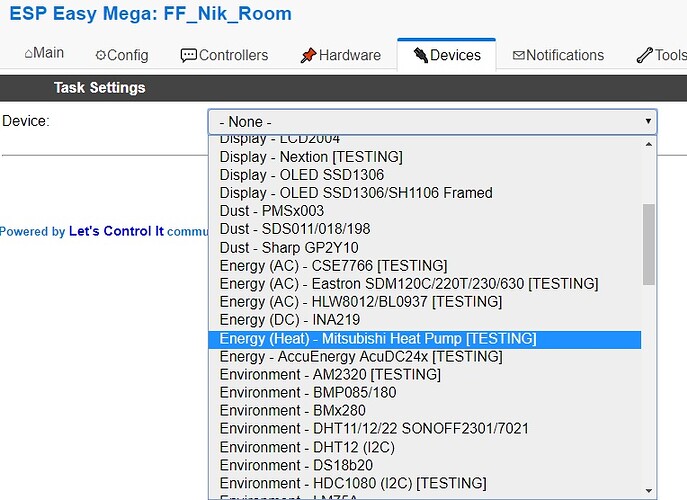
The Mitsubishi Heatpump can now be added as simple as selecting it from the list, selecting the serial port used for connection - and we are ready:

Once we hit Submit, the plugin will start sending messages through controller, i.e. MQTT with payload:

{"roomTemperature":23.0,"wideVane":"|","power":"OFF","mode":"AUTO","fan":"QUIET","vane":"AUTO","iSee":false,"temperature":24.0}

to set topic, in above example that would be FF_Nik_Room/ac/settings.

Message is send every time a change is detected (i.e. one changes settings using IR remote control) and every X seconds, as set in the settings (60 seconds in above screenshot).

Controlling AC is done through the same topic with /cmd suffix, i.e. FF_Nik_Room/ac/settings/cmd in our example. Payload:

  • MitsubishiHP,temperature,<value> - set temperature, value can be between 16 and 31;
  • MitsubishiHP,power,<value> - value = ON or OFF;
  • MitsubishiHP,mode,<value> - value = HEAT, COOL, FAN, DRY or AUTO;
  • MitsubishiHP,fan,<value> - value = 1, 2, 3, 4, AUTO or QUIET;
  • MitsubishiHP,vane,<value> - value = 1, 2, 3, 4, 5, SWING or AUTO;
  • MitsubishiHP,widevane,<value> - value = <<, <, |, >, >>, <> or SWING.

Using info from here, this is how my OH config looks like:

.things:

Bridge mqtt:broker:rasnas "MQTT Broker" [ host="192.168.2.51" ] {
  Thing topic ffNikRoom {
    Channels:
      Type number:acRoomTemperature [ stateTopic="FF_Nik_Room/ac/settings", transformationPattern="JSONPATH:$.roomTemperature" ]
      Type number:acTemperature [ stateTopic="FF_Nik_Room/ac/settings", transformationPattern="JSONPATH:$.temperature", commandTopic="FF_Nik_Room/ac/settings/cmd", formatBeforePublish="MitsubishiHP,temperature,%d" ]
      Type string:acPower [ stateTopic="FF_Nik_Room/ac/settings", transformationPattern="JSONPATH:$.power", commandTopic="FF_Nik_Room/ac/settings/cmd", formatBeforePublish="MitsubishiHP,power,%s" ]
      Type string:acMode [ stateTopic="FF_Nik_Room/ac/settings", transformationPattern="JSONPATH:$.mode", commandTopic="FF_Nik_Room/ac/settings/cmd", formatBeforePublish="MitsubishiHP,mode,%s" ]
      Type string:acFan [ stateTopic="FF_Nik_Room/ac/settings", transformationPattern="JSONPATH:$.fan", commandTopic="FF_Nik_Room/ac/settings/cmd", formatBeforePublish="MitsubishiHP,fan,%s" ]
      Type string:acVane [ stateTopic="FF_Nik_Room/ac/settings", transformationPattern="JSONPATH:$.vane", commandTopic="FF_Nik_Room/ac/settings/cmd", formatBeforePublish="MitsubishiHP,vane,%s" ]
      Type string:acWideVane [ stateTopic="FF_Nik_Room/ac/settings", transformationPattern="JSONPATH:$.wideVane", commandTopic="FF_Nik_Room/ac/settings/cmd", formatBeforePublish="MitsubishiHP,wideVane,%s" ]
  }
}

.items:

Number FF_Nik_Room_ac_room_temp "Room temperature [%.1f °C]" <temperature> { channel="mqtt:topic:rasnas:ffNikRoom:acRoomTemperature" }
Number FF_Nik_Room_ac_temp "Temperature [%.1f °C]" <heating> { channel="mqtt:topic:rasnas:ffNikRoom:acTemperature" }
String FF_Nik_Room_ac_power "Power []" { channel="mqtt:topic:rasnas:ffNikRoom:acPower" }
String FF_Nik_Room_ac_mode "Mode []" <fan_ceiling> { channel="mqtt:topic:rasnas:ffNikRoom:acMode" }
String FF_Nik_Room_ac_fan "Fan" <fan> { channel="mqtt:topic:rasnas:ffNikRoom:acFan" }
String FF_Nik_Room_ac_vane "Vane" <flow> { channel="mqtt:topic:rasnas:ffNikRoom:acVane" }
String FF_Nik_Room_ac_widevane "Wide Vane" <flow> { channel="mqtt:topic:rasnas:ffNikRoom:acWideVane" }

.sitemap:

Frame {
	Text label="Nik's room" item=FF_Nik_Room_ac_room_temp icon="climate" {
		Text item=FF_Nik_Room_ac_room_temp
		Setpoint item=FF_Nik_Room_ac_temp minValue=16 maxValue=31 step=1
		Switch item=FF_Nik_Room_ac_power mappings=[OFF="Off", ON="On"]
		Switch item=FF_Nik_Room_ac_mode mappings=[COOL="Cool", HEAT="Heat", DRY="Dry", FAN="Fan", AUTO="Auto"]
		Selection item=FF_Nik_Room_ac_fan mappings=[1="1", 2="2",3="3",4="4",AUTO="AUTO",QUIET="QUIET"]
		Selection item=FF_Nik_Room_ac_vane mappings=[1="1", 2="2",3="3",4="4",5="5",AUTO="AUTO",SWING="SWING"]
		Selection item=FF_Nik_Room_ac_widevane	mappings=["<<"="<<","<"="<","|"="|",">"=">",">>"=">>",SWING="SWING"]
	}
}

and result:

In my setup I’m using D1 mini ESP module since it can be powered directly from 5V so no additional components are needed, more or less just connecting 4 wires to it :slight_smile: Details on how to connect AC and ESP module can be found in link above. Also thinking about adding an additional DHT22 into the AC to measure humidity in the room too … need to check if there is room in the AC for it :slight_smile:

EDIT: commands now have a MitsubishiHP prefix to distinguish them from other EspEasy commands .

EDIT2: Firmware images (releases) are available here, please note MitsubishiHP plugin is part of test images, i.e. ESP_Easy_mega-20200328_test_ESP8266_4M1M_VCC and can be found within the zip file (i.e. ESPEasy_mega-20200328.zip).

EDIT3: PR was merged, image for devices with 1M flash (ESP-01, …) is here.

EDIT4: I already moved to OH3 so sharing setup for it too:

UID: mqtt:topic:homepi:acNikRoom
label: Air Conditioner Nik's Room
thingTypeUID: mqtt:topic
configuration:
  payloadNotAvailable: Connection Lost
  availabilityTopic: FF_Nik_Room/status/LWT
  payloadAvailable: Connected
bridgeUID: mqtt:broker:homepi
location: Nik's Room
channels:
  - id: acRoomTemperature
    channelTypeUID: mqtt:number
    label: AC Room Temperature
    description: null
    configuration:
      stateTopic: FF_Nik_Room/ac/settings
      transformationPattern: JSONPATH:$.roomTemperature
      unit: °C
  - id: acSetTemperature
    channelTypeUID: mqtt:number
    label: AC Set Temperature
    description: null
    configuration:
      commandTopic: FF_Nik_Room/ac/settings/cmd
      unit: °C
      formatBeforePublish: MitsubishiHP,temperature,%d
      stateTopic: FF_Nik_Room/ac/settings
      transformationPattern: JSONPATH:$.temperature
  - id: acPower
    channelTypeUID: mqtt:switch
    label: AC Power
    description: null
    configuration:
      commandTopic: FF_Nik_Room/ac/settings/cmd
      formatBeforePublish: MitsubishiHP,power,%s
      stateTopic: FF_Nik_Room/ac/settings
      transformationPattern: JSONPATH:$.power
  - id: acMode
    channelTypeUID: mqtt:string
    label: AC Mode
    description: null
    configuration:
      commandTopic: FF_Nik_Room/ac/settings/cmd
      formatBeforePublish: MitsubishiHP,mode,%s
      stateTopic: FF_Nik_Room/ac/settings
      transformationPattern: JSONPATH:$.mode
  - id: acFan
    channelTypeUID: mqtt:string
    label: AC Fan
    description: null
    configuration:
      commandTopic: FF_Nik_Room/ac/settings/cmd
      formatBeforePublish: MitsubishiHP,fan,%s
      stateTopic: FF_Nik_Room/ac/settings
      transformationPattern: JSONPATH:$.fan
  - id: acVane
    channelTypeUID: mqtt:string
    label: AC Vane
    description: null
    configuration:
      commandTopic: FF_Nik_Room/ac/settings/cmd
      formatBeforePublish: MitsubishiHP,vane,%s
      stateTopic: FF_Nik_Room/ac/settings
      transformationPattern: JSONPATH:$.vane
6 Likes

A quick update - since everything is working smoothly for more than a week now

collecting data and displaying it via grafana:

As can be seen, I also added the DHT22 (green line is temperature as reported by the AC unit, other two values are coming from DHT22)

view from my phone:

Now its time to do the same for other units I have - some pictures taken before installing into the AC

Happy soldering :wink:

3 Likes

Great work! Thank you for sharing this. I might give it a try in a few months.

IIRC, the connector used for connecting the ESP to the heatpump controller is something special. Where do you got it from? Can you share the exact type/part number etc?

The link from the first post contains a very complete guide (at the bottom of the page) on how to connect to the AC unit, therefore did not repeat it here. You can also find a list of supported units there.

Personally I used pre-crimped cables with PAP-05V-S that I bought in a local electronic shop + D1 mini ESP 8266 modules and DHT22 that I ordered from China … roughly all the parts per AC unit did cost ~ 5 euro ( ~1.5e cable + connector, ~1.5e D1 mini, ~2e DHT22).

Hello!

What version of OH do you use?
Because i have try on 2.5 and no luck :frowning:

Should be there, maybe a bit more info would be helpful?

This is very interesting. I did not see in there any reference to the relevant Mitsubishi heatpump model number. I wonder if that method would apply to any Mitsubishi heat pump?

I have 2 indoor units driven by the same outdoor unit:

I would very much like to integrate them to my OH home automation system. Given my limited expertise in microcontrollers and related software, I would hope to get a little bit of help from our community.

First, a very basic question: the microcontroller needs to be connected to the ac unit using a CN105 connector. My ceiling unit is currently controlled through a wired remote. When I open up the intake grille on the ceiling unit I can see a cable connected there using a plastic connector. Would that be where my wired remote is connected to the unit? If so, I suppose that the microcontroller would need to be connected there? And then the existing wired remote would need to be disconnected?

Turning now to the bedroom unit, which is controlled using a wireless remote, I do not see where the microcontroller could be connected. Is there a hidden location where that can be done?

Many thanks in advance for your help.

Hey!

There is an open git issue where people are reporting which units they had success with, maybe worth checking this first.

But in short - if you see something like

than chances are pretty high that your unit can be controlled as described here …

There is also a good blog how to access the connector, but that might be totally different for your case since its based on the model you own.

Don’t hesitate to reach out in case of any questions and good luck :wink:

Thanks for the tips!

Hi again.

I have now managed to access the control board of the MFZ-KA12NA and it does feature a red connector just like the one shown on your picture. So, it looks like I am in luck.

Next I need to get ESPeasy up and running. Unfortunately, I am not yet familiar with git and I find it a bit difficult to get the whole environment working… At this time, I don’t really care with the auto update mechanisms, so I am trying to shortcut the process.

What I have managed thus far is to unzip “ESPEasy_ESP32_mega-20201125.zip” and, from there, succesfully start “ESP.Easy.Flasher.exe”.In the resulting UI, the firmware menu gives me a set of options which corresponds to the list of files I can see under ESPEasy/bin. What I suppose I need to do now is find the relevant Mitsubishi configuration file and place a copy of it in the bin directory so that it appears among the options in the UI.

I have also downloaded ESPEasy-feature-mitsubishiHP_1M_OTA_bin.zip, and after unzipping it, I found that the “firmware” directory includes a file named “ESP_Easy_mega_minimal_core_263_ESP8266_1M_OTA_MITSUBISHI_HP_HA.bin”. Is it correct that all I need to do now is to copy that one file into my ESPEasy/bin?

Many thanks!

What ESP8266 based board do you have?

I haven’t bought it yet, but I was planning to buy the D1 mini. Should I do that?

I’m using D1 minis and have been working for almost a year now in 4 ACs without a problem - they are convenient since can be powered by 5V directly (ESP8266 needs 3.3V and AC gives 5V so you might need an additional converter if you go with some other board).

The reason I was asking is that the firmware image you need to upload depends on the board you have - for D1 mini you need the 4M ones, while ESP-01 only have 1M …

Long story short - download fw from here and upload firmware image ESP_Easy_mega_20200913_test_ESP8266_4M1M_VCC.bin that is in zip to D1 mini and you should be good to go.

Please note that due size exceeding avail flash size some plugins were removed from builds in latest releases, including the one for Mitsubishi HP - so either use the one from my link above (last release that still includes the plugin by default) or download source code and build a custom image with plugin added. I use an older version of firmware and since haven’t had any issues I didn’t update to latest.

OK, I have followed your advice and downloaded “ESPEasy_ESP82xx_mega-20200913.zip”. I unpacked it and started “ESP.Easy.Flasher.exe”. As soon as I receive my D1 minis I will be able to use that program to flash one or more of them using “ESP_Easy_mega_20200913_test_ESP8266_4M1M_VCC.bin”.

But now (sorry about that!) I am confused with the next step. How exactly should I proceed to install the plugin?

Thanks in advance for your kind assistance.

Hey!

There is no extra step required, the ESP_Easy_mega_20200913_test_ESP8266_4M1M_VCC.bin already contains all you need :stuck_out_tongue_winking_eye:

Thanks for your response.

If I understood correctly the manual pages I read, once I have flashed my D1 mini with your “ESP_Easy_mega_20200913_test_ESP8266_4M1M_VCC.bin”, the rest will take place by connecting OTA with the mini. Right?

Thanks again.

Not sure if I follow. Once you upload the firmware and restart the device so firmware is loaded you should be able to select the Mitsubishi hp plugin as seen in my first post.

OTA update means you can upload a new version of firmware without physically connecting your board to computer (which is handy so you don’t need to take apart ac in order to do so if there is ever need to upgrade).

I guess I am confused between the various programs/UI that are available within the ESPEasy environnement. On a Windows 10 PC, I believe that I need to use a program named “ESP.Easy.Flasher.exe” to flash your bin file onto the D1 mini, right?

But then, once that is done, what program am I supposed to use to select the Mitsubishi plugin? I find it very difficult to get the answer to that simple question in the ESPEasy doc.

I hope that it is clear that my ultimate goal is to be able to control the D1-enhanced heatpump over the air.

Many thanks for your patience.

After you flashed and rebooted your ESP there will be a new WIFI network “ESP_EASY”. You have to connect to this network and there you configure your ESP. The UI you will see is like the pictures in the first post. https://nerdiy.de/howto-espeasy-firmware-flashen/