I might write one if I find the time as I did something very similar a few weeks back: What did you build/automated today (with pictures)? - #217 by JGKK
I almost got it working.
The MCUs and the IR emitters work perfectly. I was even able to turn a fan on with my phone. The problem happened once I put the cowling back on. I was afraid of that.. the entire fan cowling is metal, and of course blocks the wifi signal. That one may not be easy to solve.
Here’s what the circuits look like, anyway. ESP-01 modules, with the RX pin (GPIO3) going to a 1K resistor and a 2N2222A transistor which feeds the IR emitter. Resistor and transistor are inside the heatshrink where you see the IR diode sticking out. The banana plugs are for connecting to a lab power supply, for the actual deployment I use small sealed 220v->3.3v PSU modules.

The RX pin was the only usable output. GPIO0, GPIO2 and TX all prevented it from booting. I had not expected that, as little load as the base of a transistor presents, especially through a 1K resistor.
Anyway sure, would be happy to detail the procedure later when I actually get it working. ![]()
Okay, so this is a bit of a problem:

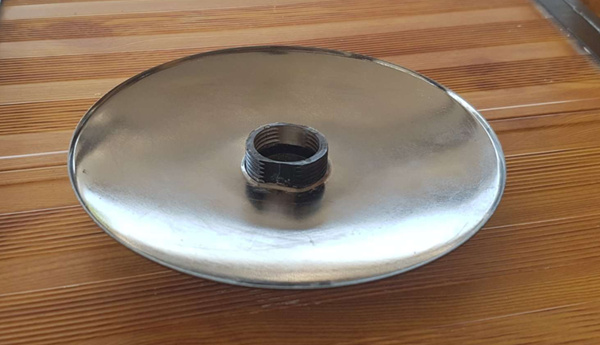
The only part that is not metal is the IR lens.. and that part is threaded, and threads into that small space around the existing IR sensor, making it impossible for a circuit board to enroach into that space.. and anywhere else inside the cowling is an RF dead zone.
I slept on it and came up with a workaround. All the different parts of the fan are anchored to the metal pipe in the middle. The pipe is hollow (obviously) and already has wires going through it. Why don’t I just add two tiny wires for the IR LED, and put everything else on top of the ceiling, away from the fan cowling? It’s not as pretty conceptually, but that won’t be visible from the outside.
I think that may be the best way. It’s just a physical reality that wifi signals will not go into a metal housing. Another way would have been to fabricate (or acquire) something out of plastic that could replace the bottom cover, but making that look good is another story.
It’s done!

In the end my kitchen ceiling fans look exactly like they did before.
What’s new is visible on the column in the lower left of the picture.

They are 433 MHz remotes, roughly $3 each on aliexpress, transmitting to an ESP8266 (NodeMCU) in the living room which is adjacent to the kitchen. The ESP8266 is running software I wrote (dependent on libraries, naturally). The upper two switches have been there for a while and control the sound system, allowing me to turn the kitchen speakers up and down, turn on/off pass-through of whatever is playing at my workstation, and the big round button with the star is to select radio stream preset, up to 9 presets (pushes), obviously the stations I listen to most often have the lowest number of pushes. ![]()
This is handled entirely with my own software and does not go through openHAB.
The lowest switch is new, and results in the ESP8266 publishing MQTT messages when a button is pushed. A jython script in openHAB acts on the MQTT messages as follows:
The left and right buttons bump the speed of the furthest and middle fan respectively. 1-2-3-0 and repeat. There is no separate control for the fan closest to the camera because there is no use case for it.
The middle button bump the slowest fan(s) one notch. If they’re all equal, they’re all slowest and thus all get bumped. Will have to see how usable it is in practice but it seems good for now. The python script controls these three items:

..and jython rules monitor those three items and publishes MQTT messages that are then picked up by ESP-01 modules placed above the gypsum ceiling as far as the wire would go, to keep it away from the metal fan housing and give the WiFi signal a chance to get through. The ESP01 modules are very small and incredibly inexpensive, literally $1.20 each. They only have 1 MB of flash memory but that’s enough for a 512kb arduino sketch and OTA update.

So, essentially three WiFi MQTT to IR gateways, one per fan.
The “Hi-Link” module is an AC to DC power supply, it takes 220v in directly and feeds the ESP-01 module. The thinner wires with header go directly to an IR diode. The transistor and base current limiting resistor are inside heatshrink under the black tape. The ESP-01 is also inside heatshrink for protection.
The IR diode itself has a wire that goes through all the way down to the bottom of the fan cowling where the IR sensor is. No physical connection, all IR.
To capture the remote signals, after having struggled with free libraries for a bit, I purchased a tool called AnalysIR, $30 for makers, which just worked, so it was well worth the money for me. It requires an Arduino Uno and an IR sensor, and their custom firmware turns it into a USB IR capture appliance. I built it into a permanent enclosure because I will definitely need it again. The rest of the work is done through their windows application, which captures and helps organize the IR signals as well as generate code ready to paste into the arduino project.

So, @rlkoshak, I would be happy to write a tutorial, but the question is – which part(s)? The entire project combines many, many different technologies that all more or less have their own tutorials.
Which part(s) do you think are most deserving of attention, so that I can focus on those?
I’d say any parts you are willing to write up. End-to-end tutorials are always very welcome and very informative. At a minimum a little about how you did the OH portions would be relevant.
Hello @rlkoshak,
you say it’s possible to set up federated OpenHAB (which sounds great) - is there a tutorial somewhere? I couldn’t find one beyond using MQTT 1.x binding. With MQTT 2 they have messed up things as it seems. ![]()
It’s actually written up in the docs, but there are some issues with the subpages of the MQTT doc readme.
I’ve written a full tutorial since people seem to be having difficulty with this. Marketplace MQTT Event Bus
Thank you so much for your effort. It’s indeed messed up in MQTT 2 it seems, as for what I can tell for 1.x it worked “out of the box” with minimum effort. I wonder, how this can be considered an improvement? But that’s not your fault and I am so glad you wrote this up. I’ll study and try to implement.
This essentially means that I have to create specifically a group now and put all my items in there it seems… wow.
-
Automatic discovery of devices following the Homie or Home Assistant standard.
-
The ability to create, edit, and manage Things through the REST API.
-
Chaining transformations.
-
Proper behavior when the broker goes offline (i.e. if the broker goes offline all of the Things that go through that broker get set to UNDEF).
-
Will continue to have support going forward; 1.x binding support in OH 3 is in doubt.
-
Support for Profiles.
-
Presentation and management more inline with the rest of the OH 2.x bindings.
-
Support for the embedded broker.
-
The Action does not need to be separately installed.
But yes, in this one small use case that is frankly not really used all that much, MQTT 2.x is a tiny amount of extra work compared to the MQTT 1.x event bus configuration. But part of that has to do with the fact that the MQTT 1.x binding implements the event bus in a way that is not allowed for MQTT 2.x bindings.
And it is under discussion that OH 3 there will be native support for federation between OH instances.
Personally, I like the fact that we need to define each Item we want to be put on the MQTT event bus. It is not always the case that one would want all their Items synchronized but the MQTT 1.x binding only allowed all or nothing.
And, at least for the time being, there is nothing stopping you from using the MQTT 1.x binding for this.
This is one of the most common and powerful uses of Groups.
- Design Pattern: Group Based Persistence
- Design Pattern: Associated Items
- Design Pattern: State Machine Driven Groups
- Design Pattern: Sensor Aggregation
- Design Patterns: Generic Is Alive
- Design Pattern: DRY, How Not to Repeat Yourself in Rules DSL
I could go on. All of these and many more require specifically creating a Group and put all the Items you want to control the behavior of into that Group. If the prospect of doing this is a problem, I have to wonder how many missed opportunities you have to simplify your Rules and make them more generic, shorter, and more maintainable.
Many domestic cabinets are plastic … but yeh, radio devices snuggled up to high current wires and busbars seems like an ambitious idea.
But then, I’m not really convinced about those Shelly WiFi DIN relays either. Can I have a wired ethernet version, please?
I note lots of cheap wired modbus power monitors on eBay these days.