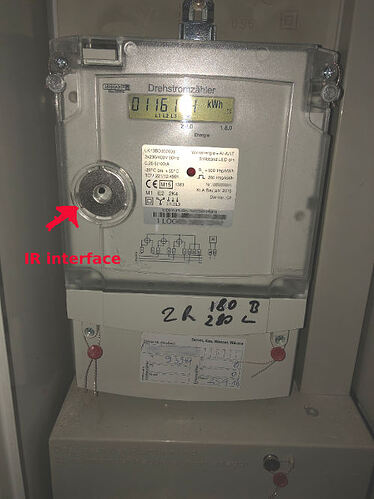
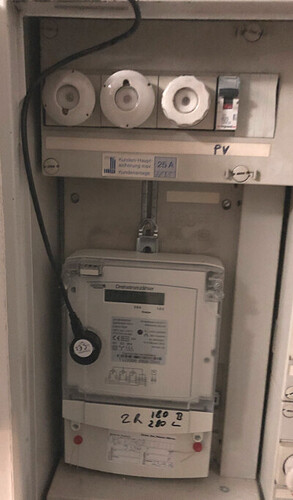
As a data nerd I wanted to know how much power I am consuming or feeding-in with my solar inverter. In Germany the old Ferraris Electricity meter are being replaced to electronic versions, but unfortunately not all of them are smart. However most of them have an infra-red interface and this tutorial describes how you can read it using a IR head and a raspberry pi.
Hardware you need:
- verify you have the IR interface on your Electricity meter
- a raspberry pi close to your Electricity meter with Wifi access to your home network and SSH running. I guess there are enough tutorials around how to set it up.
- a IR read/write head with USB (Optohead). I bought this one for ~45 EUR, but you could build them yourself as well (here a instruction in German)
Once you plug the USB part into your raspi and put the IR head onto your Electricity meter, your ready to go.
First you can test it, using this instructions:
Open one SSH terminal and enter:
stty -F /dev/ttyUSB0 300 -parodd cs7 -cstopb parenb -ixoff -crtscts -hupcl -ixon -opost -onlcr -isig -icanon -iexten -echo -echoe -echoctl -echoke
cat /dev/ttyUSB0
Open a second SSH terminal and enter within 2 minutes:
echo -n -e '\x2F\x3F\x21\x0D\x0A' > /dev/ttyUSB0
echo -n -e '\x06\x30\x30\x30\x0D\x0A' > /dev/ttyUSB0
If it works, you should ge an output similar to this:
/?!
/LOG4LK13BD202035
C.1.0(0xxxxxx)
0.0.0(001LOG000xxxxx)
F.F(0000)
1.8.0(011021.857*kWh)
2.8.0(011614.452*kWh)
C.7.1(00000002)
C.7.2(00000003)
C.7.3(00000002)
Interesting for us is the value 1.8.0 (the power being supplied) and - if you produce power - the value 2.8.0 (the power you feed-in).
There are different ways to make use of these values, e.g. there is a node-red module you could use. My way is to have a small python script on the raspberry pi which runs every 5 min, posting the values via MQTT:
#!/usr/bin/env python
import time
import sys
import serial
import re
import paho.mqtt.client as mqtt

broker_address="namibia"
client = mqtt.Client("P1") #create new instance
client.connect(broker_address) #connect to broker


ser = serial.Serial(
 port='/dev/ttyUSB0', baudrate = 300,
 parity=serial.PARITY_EVEN, stopbits=serial.STOPBITS_ONE,
 bytesize=serial.SEVENBITS, xonxoff =False,
 rtscts  = False, dsrdtr  = False, timeout=1)
print(ser.name)         # check which port was really used
ser.write(b'\x2F\x3F\x21\x0D\x0A')     # write a string
ret=ser.readlines(5)
print (ret)
time.sleep(1)
ser.write(b'\x06\x30\x30\x30\x0D\x0A')
ret=str(ser.readlines(150))
m = re.search('1.8.0\((.+?)\*', ret)
if m:
  supply=m.group(1)
  print (supply) #kWh
  client.publish("power/supply",supply) #publish kWh taken from power provider
  time.sleep(1)
m = re.search('2.8.0\((.+?)\*', ret)
if m:
  feedin=m.group(1)
  print (feedin) #kWh
  client.publish("power/feed",feedin) #publish kWh feeded in to  power provider

ser.close()
On your raspberry you need pyserial and paho-mqtt to be installed (pip install…). In your openhab setup you need to have a MQTT broker up and running - there are various tutorials around how to set this up.
Then you can come up with something like…
…in your thing file (if you setup your MQTT broker via files):
...
Thing topic sensoren {
    Channels:
        Type number : power_supply "Strombezug" [ stateTopic="power/supply", retained=true]
…and in your item file:
Number Power_Supply "Strombezug [%.1f kWh]" <energy> (gUG) { channel = "mqtt:topic:brokerhome:sensoren:power_supply" }
I integrated the items into a influxdb persistence - there is as well a great tutorial on how to set this up.
That’s it in a nutshell. Let me know if something is missing.


