Hello,
after being on OpenHAB for 3 years and having received lots and lots of help in this community - I thought I could also share some of my learnings - maybe this could be of help for someone trying to get started?!
I will go through my Setup and how I installed it - not saying this is how it should be done or that this is the only way, but it works for me slight ![]()
My setup:
- a RaspBerryPi 4 with 8GBRAM and 64GB SD Card
- Raspbian on the PI
- Docker
In the Docker I run:
- Portainer as graphical UI to help me with some of the configuration
- OpenHAB 3.0.0
- NodeRed
- Grafana
- InfluxDB
In the following I’ll try to walk you through How to achieve this setup so lets get started:
Install RaspBian:
I followed the official RaspBerry Setup Guide Raspberry Setup Guide
After the Install you need to activate SSH by logging in to your freshly installed Raspberry and activate SSH:

Install a SSH Client
in order to proceed you’ll need to SSH into your Raspberry with something like Putty or - I use SmartTTY
Install Docker:
I found a very good help at the “Homenetwork Guy” from which I extracted the below parts for docker and portainer install Link
SSH into your Raspberry and execute the following command:
curl -sSL https://get.docker.com | sh
f you wish to run docker without running the command with “sudo” then you can add the default Raspberry Pi user “pi” to the “docker” group:
sudo gpasswd -a pi docker
You will need to log out and back in or reboot your Raspberry Pi in order for the group change to occur.
sudo reboot
Install Portainer
First create a volume for the Portainer (this is your first docker container)
sudo docker volume create portainer_data
Then run the following command to install the docker container “Portainer”:
docker run -d -p 8000:8000 -p 9000:9000 --name=portainer --restart=always -v /var/run/docker.sock:/var/run/docker.sock -v portainer_data:/data portainer/portainer-ce:linux-arm
f your Raspberry Pi is located at 192.168.1.6, for instance, then go to http://192.168.1.6:9000 to go to the Portainer web administration page. The first time you open portainer you will need to set up an admin user:

After you log in, you will need to select “Local” and click “Connect” since you are connecting to the local Docker installation:

Then click on the “containers” and you’ll see an overview of your containers - currently only the “portainer”

Installing OpenHAB3 in docker/portainer:
I documented the installation with a series of screenshots:
For the NAME you can choose whatever you like - this will be the Name of your OpenHAB docker container later


For the host name you can also choose whatever you like

Then you need to find out your UserID and GroupID and enter them in the Environment variables:
go back to your terminal / ssh and enter id pi

then enter Environment Variables with the Numbers (here it’s 1000) in the ENV Tab of Portainer:

then click on deploy the container

and wait until the container is deployed - this might take 5minutes..
Then you should be able to login to your openhab with YourIP:8080
Install Samba to get access to your conf folder (from Windows)
Install samba on your Raspberry:
sudo apt-get install samba samba-common smbclient
this might take a little..
Check if samba is running
sudo service smbd status
sudo service nmbd status
It should tell you that the services “smbd” and “nmbd” are running
Since the default conf file is rather large - I backed up the current one and made a very simple basis conf file:
sudo mv /etc/samba/smb.conf /etc/samba/smb.conf_alt
sudo nano /etc/samba/smb.conf
Then enter the following:
[global]
workgroup = WORKGROUP
security = user
encrypt passwords = yes
client min protocol = SMB2
client max protocol = SMB3
to save and close:
Crtl+ O
Return
Crtl+ X
Then test the configuration with Testparm
Hope no error came up?!
After every change you need to restart the samba services:
sudo service smbd restart
sudo service nmbd restart
Samba is now running - but we need to give now permission to the config folder and the pi user. I am giving ownership to the pi user for the Homefolder of pi:
sudo chown -R pi:pi /home/pi
sudo chmod -R 700 /home/pi
Then I add the path and name to the conf file to be found later when connecting via Win-Explorer:
sudo nano /etc/samba/smb.conf
[SambaPiHome]
comment = Samba-Pi-Home
path = /home/pi
read only = no
to save and close:
Crtl+ O
Return
Crtl+ X
Then test the configuration with Testparm
Hope no error came up?!
After every change you need to restart the samba services:
sudo service smbd restart
sudo service nmbd restart
With this the folder should be visible in the network - but you do not yet have access. You need to generate the passwords for the user:
sudo smbpasswd -a pi
after entering the password you need to enter this a second time to confirm
to deactivate the user use:
sudo smbpasswd -d pi
to activate the user:
sudo smbpasswd -e pi
now you should be able to map the above path as drive into your MS Explorer
Install NodeRed:
mkdir node_red_data
sudo chown -R 1000:1000 node_red_data
docker run -it -p 1880:1880 -v /home/pi/node_red_data:/data --name NodeRed -e TZ=Europe/Berlin nodered/node-red
Install Grafana:
Grafana I installed again using portainer.
Note: the default admin user and password for Grafana is: user: admin pwd: admin


with the following Environment variables you allow to pullup Grafana (e.g. from Openhab) without the need of a login.

And.. as always “Deploy the container”
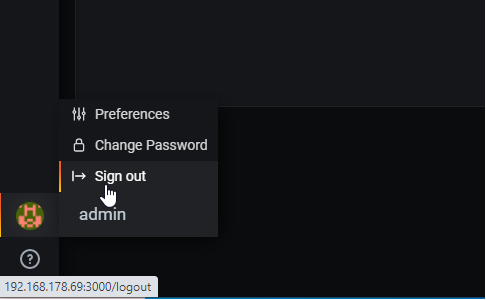
Attention: now you can open Grafana - yet you will not be able to do anything unless you sign in as admin - so first sign out then back in!
Then you can access Grafana with "YourIP":3000
Yet - in order to display anything you’ll need a database first - so lets:
Install InfluxDB:
again I used Portainer to install InfluxDB:


With the following Environment Variables you:
- Create a default Database with the name: OpenHAB3_DB
- Ensure that you need to authenticate
- Create the admin user & password
- Create read user - grafana for grafana to be able to read the data
- Create write user - openhab for openhab to be able to write the data
- (maybe you want to select better passwords than I did in my screenshot)


And.. as always “Deploy the container”
Now you should be able to go back to Grafana and setup the connection to your “OpenHAB3_DB”
Hope this tutorial helps to get started…

