Hello community,
I spent the last few days searching through the forum to get some Tuya-Bulbs (they usually sell as “Smart life”) working in OH2.
I noticed that it is hard for a beginner to get this done, because all information is spreaded in different threads and postings, so I decided to put it all together in a step-by-step walk through here.
I also found a rather elegant way to get the essential Tuya parameters (Tuya ID and LocalKey) which I also want to share here.
Furthermore, I found out the Tuya-MQTT-Binding from AgentK to be reliable and fast, so I used it.
Let’s start:
Prerequisites:
- OH2 up and running, accessible by ssh or console
- One or more LED-Bulbs configured in the Smart-Life app (should be controllable by the Smart Life app)
- Basic OH2-Knowledge (add Bindings, find config-files and edit them)
- Installed node.js
We start with installing Mosquitto. Do so by opening
sudo openhabian-config
and choose “Optional components”. Choose Mosquitto from there and install with default settings.
Important: During installation, you are asked for a user, accept default (openhab) and leave password blank!
Next, install MQTT-Binding using Paper-UI.
After installation, open services/mqtt.cfg and uncomment/fill the following paramaters:
broker.url=tcp://localhost:1883
broker.clientId=openhab
broker.user=openhab
Everything else is left untouched. Save mqtt.cfg and exit.
Next, install the Tuya-MQTT-Client from AgentK. Use the instructions given in the README.md
Start the script is running with
/usr/bin/node /etc/openhab2/scripts/tuyaapi_mqtt/tuya-mqtt.js
Now we move over the the most complex, but also interesting part. To control Tuya-Devices, we need to know their IP, DeviceID and LocalKey. First two are easy, but the key needs some tricks. But let’s do it step by step.
To find out the DeviceID of a Tuya-bulb, open the Smart Life app. Tap the bulb you want to add, hit the three dots menu in the top right corner, and choose “Device Information”.
You will find a Virtual ID, note it down. This is the DeviceID of the bulb. Mine for example is 12204702807d3a252d43. Also note the MAC-Adress, we need in the next step.
Next, we need the IP of the bulb. But be careful, we need the internal IP of the bulb in your network, the app shows the external IP of your router. To find the internal IP, note the MAC adress. In my case:
80:7d:3a:25:2d:43
Then, issue a
arp -a
on your console. You will get a list with IPs and MAC-Adresses, find the MAC of your bulb and note the correspondig IP. In my case:
ESP-252D43.fritz.box (192.168.75.119) at 80:7d:3a:25:2d:43 [ether] on eth0
Note the IP-Adress.
Now comes the difficult part, getting the Tuya LocalKey. There are a lot of methods around using MITM-attacks and Proxies, but I found a “easier” way.
The Smart Life app stores the LocalKey in a XML-File on your phone/tablet. Usually you can’t access it until the phone is rooted. But don’t worry, no need to root your phone, there is a easier way.
We will install a Android emulator, root it, install the Smart Life app and extract the keys. To do so, go to
and download the latest BlueStacks Tweaker (Link is on top of the page) and Bluestacks installation (down below) according to your OS (32/64Bit).
Also go town to “utils” and download SuperSu 2.82-SR5.apk and Root Checker Pro 1.6.2.apk.
Then install Bluestacks, and after installation, follow the first instructional video on the page to root Bluestacks.
With rooted Bluestacks, go to Play Store and Download “Smart Life” app. Make sure to run it once, login and access your bulbs once!
This is essential because only when doing so, it will get the configuration to our Bluestacks rooted phone!
Next, install “ES File Explorer” from Google Play store.
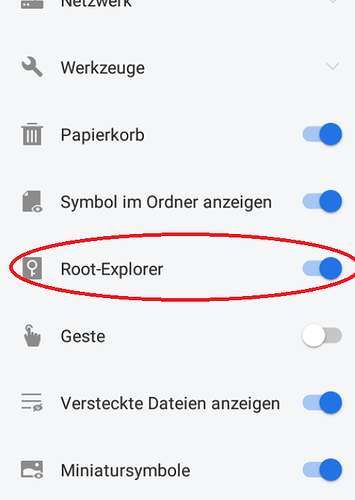
Set ES File Explorer to “Root Mode” (Scroll down left to find “Root Explorer”)
a warning will popup if root sholud be granted, grant it.
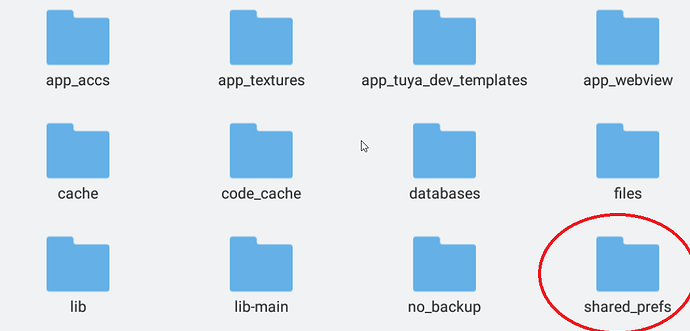
Now on the right, navigate to
/data/data/com.tuya.smartlife/shared_prefs
You end up in a folder with some XML-files, this is where we want to go.
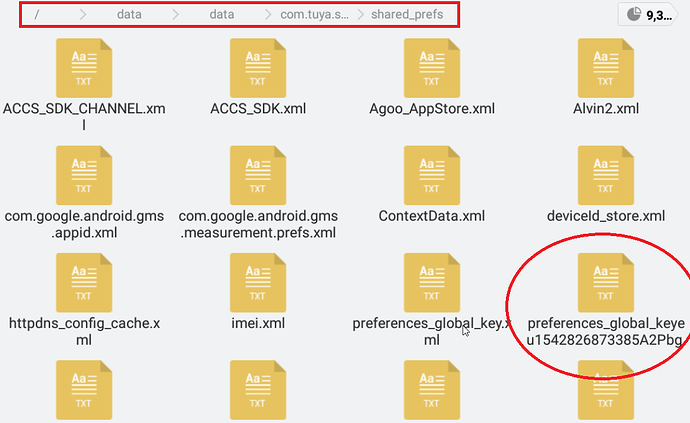
Find the file called
preferences_global_key_<some chars and numbers>.xml
and click it. ES File Explorer will open it. On the first look, this file looks weird, but you will find the ID of your bulb there, and next to it… the desired local key!
Note it down carefully (in my example: 0399de7c4a27915b), and if necessary repeat the procedure with other bulbs you have.
Close Bluestacks and continue in Openhab.
With the knowledge of IP, ID and Key of our bulb, we set up an item. The order of Tuya-Information we need to pass to the MQTT is:
tuya/lightbulb/<tuyaAPI-id>/<tuyaAPI-key>/<tuyaAPI-ip>
For my example
<tuyaAPI-id> 12204702807d3a252d43
<tuyaAPI-key> 0399de7c4a27915b
<tuyaAPI-ip> 192.168.75.119
So the complete item looks like:
Switch tuya_test1 "LED2" <light> {mqtt="<[broker:tuya/lightbulb/12204702807d3a252d43/0399de7c4a27915b/192.168.75.119/state:state:default:.*], >[broker:tuya/lightbulb/12204702807d3a252d43/0399de7c4a27915b/192.168.75.119/command/on:command:ON:true], >[broker:tuya/lightbulb/12204702807d3a252d43/0399de7c4a27915b/192.168.75.119/command/off:command:OFF:false]"}
Now add the item to your sitemap:
Switch item=tuya_test1
…and enjoy switching the Tuya-bulb in OH2.
Some remarks:
As you noticed above, we started the tuya-mqtt.js by hand in console. As I wanted it to start in the backround at reboot, I added it to /etc/rc.local before “exit 0”:
...

 /usr/bin/node /etc/openhab2/scripts/tuyaapi_mqtt/tuya-mqtt.js < /dev/null &

exit 0
If someone has a more elegant way, please let me know.
Another remark: The tuya-mqtt.js script stops working if a Tuya-Device is for example physically removed and needs to be restarted. Because of this, I added it as a service to systemd like this:
cd /lib/systemd/system/
sudo nano tuyaapi-mqtt.service
Content:
#!/bin/sh -
[Unit]
Description=tuyaapi-mqtt

[Service]
ExecStart=/usr/bin/node /etc/openhab2/scripts/tuyaapi_mqtt/tuya-mqtt.js
Restart=always
User=openhabian
Group=openhabian
Environment=PATH=/usr/bin/
Environment=NODE_ENV=production
WorkingDirectory=/usr/bin/

[Install]
WantedBy=multi-user.target
Alias=tuyaapi-mqtt.service
Issue the following commands:
sudo chmod 644 /lib/systemd/system/tuyaapi-mqtt.service
sudo systemctl daemon-reload
sudo systemctl enable tuyaapi-mqtt.service
sudo systemctl start tuyaapi-mqtt.service
This runs the script as a service at reboot and startup, and automatically restarts the script if it fails for whatever reason.
With this solution, I realised a fast responding and reliable Tuya-Switching. And because the tuya-mqtt.js reports the state back to OH2, the corresponding switch always shows the actual state of the lamp, even if you switch it outside of OH2 (e.g. using Smart Life app or Alexa).
Thanks a lot to AgentK for developing the script and the support! Also to @tsightler for the update of the script to work with the new MQTT-Binding.
Update for MQTT-Binding 2.4
Since the initial version of this guide, Openhab 2.4 was launched and brought us a new binding for MQTT. In the following steps I want to show how to migrate to the Openhab 2.4 MQTT binding.
First of all, let’s get rid of Mosquitto (if already installed), there is a embedded MQTT broker in Openhab 2.4 which we will use. Issue the following command:
sudo apt-get remove mosquitto
Next, get the latest version of AgentK’s tuyapi-mqtt-script. I would suggest to completely remove the directory:
cd /etc/openhab2/scripts
rm -rf tuyaapi_mqtt
Get the new version of the script:
cd /etc/openhab2/scripts
git clone git@github.com:TheAgentK/tuyaapi_mqtt.git
cd tuyaapi_mqtt
npm install
Create your configuration file:
cp config.json.sample config.json
nano config.json // edit the configuration file only if not using default configuration of MQTT broker
Start command
node tuya-mqtt.js

// For debugging purpose
DEBUG=* tuya-mqtt.js
Alternatively use the hints above to make the script auto-starting at system start.
Next, go to Paper UI (Addons → Bindings). Uninstall the legacy 1.x Binding and install the new binding.
Now we need the embedded MQTT broker. To do so, go to Addons → Misc and select “Embedded MQTT Broker”. For our basic setup, the broker needs no further configuration.The embedded Broker should also appear in your “Things”-List.
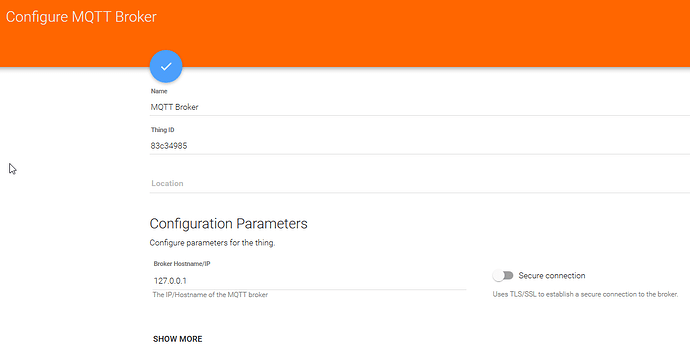
Yes I know, it seems endless, but we are almost done ![]() Next we need a MQTT bridge which connects our MQTT-things to the broker. Go to Inbox, select “+” to add a thing, choose MQTT-Binding and “add manually”. We need the “MQTT Broker”. Enter “127.0.0.1” as IP-Adress. That’S all and save.
Next we need a MQTT bridge which connects our MQTT-things to the broker. Go to Inbox, select “+” to add a thing, choose MQTT-Binding and “add manually”. We need the “MQTT Broker”. Enter “127.0.0.1” as IP-Adress. That’S all and save.
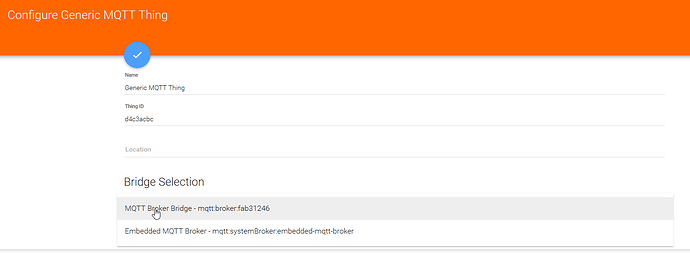
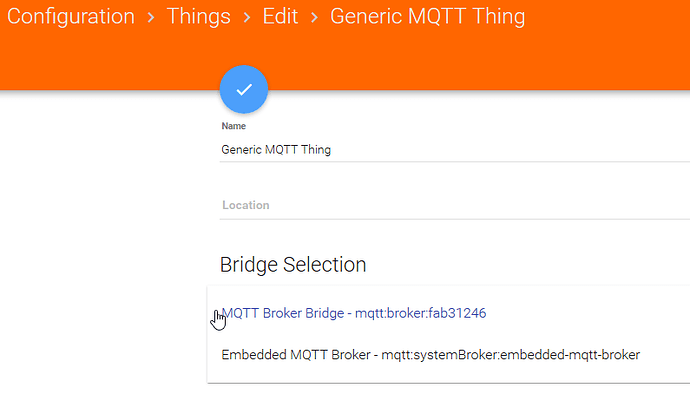
Now, again we to Inbox, select “+” to add a thing, choose MQTT-Binding, and this time the “Generic MQTT Thing”. And while we add it, we select the MQTT-Bridge we have created in the step before:
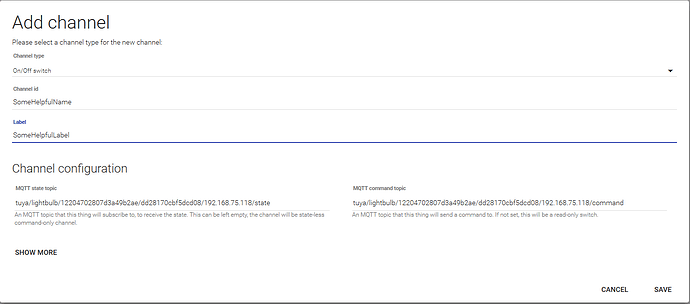
Then we go back to “Things” and find our “Generic MQTT-Thing” in the list. We click it, and with “+” we add a channel of type "On/off Switch:
Populate the “State Topic” and “Command Topic” with the follwing pattern:
tuya/<tuyaAPI-type>/<tuyaAPI-id>/<tuyaAPI-key>/<tuyaAPI-ip>/state
tuya/<tuyaAPI-type>/<tuyaAPI-id>/<tuyaAPI-key>/<tuyaAPI-ip>/command
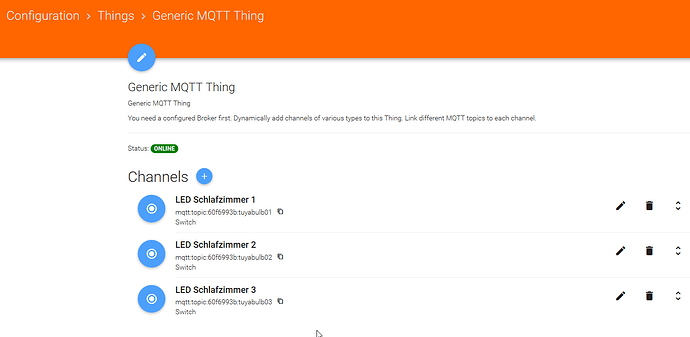
Be careful when choosing the channelID cause it can not be changed later, I used “tuyabulb01” for example, and “Tuya LED 1” as Label. It is very helpful to identify the lamps later in the UI:
And finally… link the new channels to your items. You can group items to switch single bulbs at once, I did so for my sleeping room:
Group:Switch:OR(ON, OFF)   group_OG_Schlafzimmer_Licht   		"Licht Schlafzimmer"  			<light>				(ogLight)
Switch tuya_OG_Schlafzimmer1   <light> (group_OG_Schlafzimmer_Licht)  {channel="mqtt:topic:60f6993b:tuyabulb01"}
Switch tuya_OG_Schlafzimmer2   <light> (group_OG_Schlafzimmer_Licht)  {channel="mqtt:topic:60f6993b:tuyabulb02"}
Switch tuya_OG_Schlafzimmer3   <light> (group_OG_Schlafzimmer_Licht)  {channel="mqtt:topic:60f6993b:tuyabulb03"}
Tataaa, you are done!
Just in case we restart OH2:
sudo systemctl restart openhab2.service
And after restart, you should be able to control your Tuya-LEDs in OH2 with the new MQTT Binding. Enjoy!

